City of Bronze - The Order of Three
Zone & Instance Info Gather Zone: Argath, Bastion of Illdaera
NPC Name: General Tyronith
NPC Location: Inside the Pinnacle council chambers (loc -25, 470, 9)
Keyword to Enter: ready
Flag & Key Requirements | Zone Flag: | | None |
| Event Key: | | None |
| Group Mission: | | None |
| Event Flag: | | Record of Fables Level: 4/5 |
| Alaran Language: | | None |
* Minimum to be Piggy/85'/pushed into raid: Nothing required.
Brief Event Overview and Strat* Mandatory Audio/Text GTT Trigger information is available in the GTT section further down in this post.
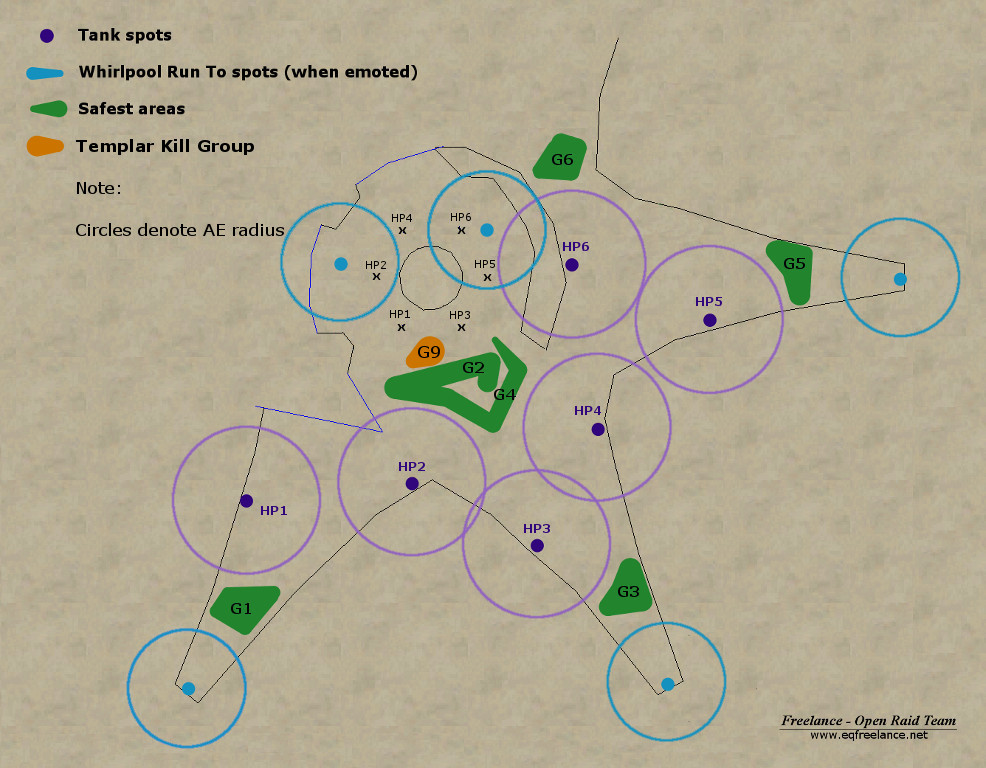
STAGE 1:- A miniboss is located in each corner of the city (NW, NE, SE, SW).
- Each miniboss has a special ability, AE and all spawn adds at 25% HP intervals. Additional adds can spawn for failure to cure properly.
- Corner areas fire off a unique AURA that lands on many every minute or so.
- Our objective is to muscle through the AURA/Debuff AE, as we kill each corner boss and adds while dealing with its related special, be it curing, directional AE etc.
STAGE 2:For this stage, we deal with THREE bosses, High Priest Jerinos on the rooftop and various adds.
One of the three bosses powers up every 2 minutes, and becomes damageable. When it POWERS DOWN, the entire group of its current target will be ported to the ROOFTOP to deal with HP Jerinos and archers. When HP dies, the rooftop porting stops. Archers do not respawn once killed.
A powered up boss hits for 25000; powered down version hits for only 3000. Changes reset agro. Each boss has a bag of tricks we must react to and overcome.
During this entire stage, 1 add spawns in EACH of the four corners every 2 minutes. They must be killed before reaching the raid; stealing our pie and ruining our night.
GRAND ARCHON = West main raid area, RANGE DPS to avoid 90k DD + Knockback + Silence
CHIEF OFFICIAL PYNTARA - South corridor. Run away when any Procedural Failure debuff lands on you. Do not cast spells, or melee, it makes it worse (drains mana/procs DD). Run away first before trying to detrimental cure (RCAA/etc). Return when debuff gone.
ARCH CARNIFEX = North corridor. Don't touch unless assigned to this one. Only get on hatelist if/when MA calls. This boss paths, and there's an AURA we must stand in to BLOCK Infinite Pain (100k DD). Try your best to detrimental cure Bonds of Guilt (4k mana drain/20k DoT + stun).
STAGE 2 - CORNER ADDS:Players assigned to this area, regardless of class, if you have the appropriate cure available related to your area, mem it and use it. These will be slim group setups as we want to dedicate the bulk of our resources to the main raid and just keep pace killing these adds.
Someone take lead in each of these groups please, to help ensure cure/reactions is being done effectively.
NORTHEAST = Mem Poison cure. Avoid backside against raptors.
NORTHWEST = Mem Curse cure, remove DoT before fade or else additional adds spawn.
SOUTHEAST = Range DPS Dervishes, except for Tank. Selyrahs, avoid backside.
SOUTHWEST = Mem Disease cure, remove DoT before fade or else 50k DD + guppy adds spawn.
Any questions, please reply to this thread, and/or ask in the FLRaids:raids channel. Thanks.
Stage 1 - Four TowersA miniboss is located in each corner of the city (NW, NE, SE, SW).
Each miniboss has a special ability, AE and all spawn adds at 25% HP intervals. Additional adds can spawn for failure to cure properly.
Corner areas fire off a unique AURA that lands on many every minute or so.
Our objective is to muscle through the AURA/Debuff AE, as we kill each corner boss and adds while dealing with its related special, be it curing, directional AE etc.
Below is a brief rundown of each corner:
SOUTH EAST - Winly, Templar of Tides
SOUTH WEST - Vocalist Oolamar
NORTH WEST - Beastmaster Graw
NORTH EAST - Illuminator Trellivino
Stage 2 - More Bosses, Rooftop Adventure and AddsFor this stage, we deal with THREE bosses, High Priest Jerinos on the rooftop and various adds.
One of the three bosses powers up every 2 minutes, and becomes damageable. When it POWERS DOWN, the
entire group of its
current target will be ported to the ROOFTOP to deal with HP Jerinos and archers. When HP dies, the rooftop porting stops. Archers do not respawn once killed.
A powered up boss hits for 25000; powered down version hits for only 3000. However! Each boss has a bag of tricks we must react to and overcome.
During this entire stage, 1 add spawns in EACH of the four corners every 2 minutes. They must be killed before reaching the raid; stealing our pie and ruining our night.
GRAND ARCHON SOLIRAN Spawns west. When powered up becomes: Possessed Grand Archon Soliran)
Powered UP:
Infinite Enforcement - 90k DD + Melee Silence + Knockback (100' range)
Powered DOWN:
Enforcement - 65k DD + Knockback (50' range)
CHIEF OFFICIAL PYNTARASpawns south. When powered up becomes: Governed Chief Official Pyntara
Powered UP:
Consummate Clerical Error - Viral 100% SPELL SLOW, only effects PRIESTS (Cleric, Druid, Shaman).
Peerless Procedural Failure - Viral Debuff that procs a 5k MANA DRAIN (
Mindshock) whenever a spell is cast, and a Melee Proc mod that procs a 5k DD on melee (
Bodyshock).
Officious Rebuff - 400 DS (Self)
[/list]
Powered DOWN:
Clerical Error - Viral 100% SPELL SLOW, only effects PRIESTS (Cleric, Druid, Shaman).
Procedural Failure - Viral Debuff that procs a 5k MANA DRAIN (
Mindshock) whenever a spell is cast, and a Melee Proc mod that procs a 6k DD on melee (
Bodyshock).[/list]
ARCH CARNIFEX WILOSpawns north. When powered up becomes: Ensorcelled Arch Carnifex Wilo
Powered UP:
Bonds of Guilt - 20k DoT + 5k Mana Drain + Stun (PBAE, 200' range)
Infinite Pain - 100k DD + Stun + Blind (single-target, all on hatelist)[/list]
* Infinite Pain is BLOCKED, by standing in the MOVING AURA called Dream Guard. You have to keep moving as the aura moves to avoid being killed.
Powered DOWN: Nothing, just straight up melee hits.
Stage 2 - Corner Adds - Assigned players be aware of the specific mob types for your area, and load the proper cures.
- The cures are low counters, which means all sorts of classes can help cure, not just healers.
- Our setup for these corners will be as slim as possible to keep pace with the adds; allowing us to maximize our force at the main raid.
NORTHEAST: bestial raptors and monstrious mounds
For mounds, use POISON CURE to remove:
Deadly Sprouts DoT before it fades, or SUFFER: 40k DoT + Root (
Sprouting Death)
For raptors, avoid the backside to not get hit by 30k DD + knockback.
NORTHWEST: dread lights
Use CURSE CURE to remove:
Clinging Fire DoT before it fades, or SUFFER: Dervish adds spawn (
Birth of FireSOUTHEAST: dervishes and selyrahs
Dervishes, all but tank, distance yourself to avoid the AE DD (30k PBAE DD, 50 range)
Selyrahs, avoid their backside (30k DD + Stun + knockback tail sweep)
SOUTHWEST: scavengers
Use DISEASE CURE to remove
Parasitic Infestation DoT before it fades, or SUFFER: 50k DD + guppy adds spawn (
Parasitic Explosion)
Note: I'm missing a couple mobs, as we know two types spawn in each corner. For now, just adapt/report if you notice a type not listed spawning in your assigned area.
Text / Audio Triggers - Mandatory
ALL Mandatory SetupGTT All-in-One Puppy: voa-cob-trigs.gttAudio Files:
Alert5.wavinfected-run-away.wavget-cured.wavmove-away-from-the-back-side.wavArch Carnifex Wilo100k DD + STUN + BLINDYou're not going to outrun this in under 10 seconds. Instead, you must stand in the NPC AURA
Dream Guard. It'll protect you from both the 100k DD and Blind.
Position so that you always have one of the Dream Guard Aura NPCs in your line of sight; when trig fires, move to it real quick. Easy! /em runs!
Note: They have visual spell/aura effects, so turning on those options to see them will help as well (ie, like Al`Kabor raid in HoT).
Warning Pattern: Once you bleed a little, I will boil off what little blood you have left!
AE: 100k DD + Stun + Blind (
Infinite Pain single-target, all on hatelist)
Action: Stand in the NPC pathers AURA to protect you[/list]
20k DoT + 5k MANA DRAIN + STUNWhen the emote fires, RUN AWAY! Return once 10 seconds has elapsed (overlay timer with the trigger provided).
Positioning to be max distance helps, as you won't have to run as far to go beyond 200' range in order to avoid the AE.
Pattern: The blades come from the darkness to show you the wrongs you have done
AE: 20k DoT + 5k
Mana Drain + Stun (
Bonds of Guilt PBAE, 200' range)
Action: RUN AWAY[/list]
GTT Carnifex Triggers: voa-cob-carnifex-trigs.gttAudio Files:
runaway.wav* carnifex-get-in-the-dream-guard-aura-now.wav* Important - Read This: Carnifex triggers will fire often. During prep, EDIT the TWO Carnifex ones above by adding a couple dashes (--'s) to the end of each pattern. This will prevent them from firing (distracting you at the wrong time).
Once it comes time to kill Carnifex, remove the dashes.
We'll remind at the appropriate times as well.

 OR
OR  = CURE IT!
 OR
OR  = DO NOT CURE![/list]