Show Posts

This section allows you to view all posts made by this member. Note that you can only see posts made in areas you currently have access to.


Topics - Furro

Pages: 1 ... 88 89 [90] 91 92
1336
Upcoming Events & Strategy / VoA - Argath - Illdaera's Vengeance
« on: December 07, 2011, 09:33:23 PM »
 
 
Argath - Illdaera's Vengeance
*[12/19/2011] NOTICE: This post has been modified to reflect amendments posted within this thread *

Zone & Instance Info
 
Zone: Argath, Bastion of Illdaera

NPC Trigger: Atleris, Council Pinnacle
NPC Location: Argath, inside Pinnacle council chamber (top level area, central)

Keyword to Enter: execute

Event Timer:  N/A until boss active.

Leashing Mobs: N/A at this time.


Flag & Key Requirements
 

Zone Flag: None
Event Key: None
Group Mission: None
Event Flag: None
Alaran Language: None


Brief Event Overview and Strat

Any questions, please ask in the FLRaids:raids channel, and/or reply to this thread.  Thanks.

This raid is a scaled up version of the group mission Illdaera's Vengeance, but with some twists.

The Avatar of Steel starts off invulnerable.

We use the guns on the ledges, to fire at Avatar, which causes adds to spawn.  The adds drop shards, which are used to power the carts, and move the water platform above; causing steam, which makes Avatar vulnerable to the cart explosives.

Avatar is perma-rooted, has various AE's; with related emotes.  Refer to the Text/Audio Trigger section below for details.

At 69% - Adds: a steel pattern - Spawn under/at Avatar - Assigned group(s), ASSIST MA2 and KILL PATTERNS when they spawn.  They do not attack back.  They'll path towards someone and morph into a 16k hitter called "recreation of steel".  Pattern Spawn Trigger Emote = drops a piece of steel from its body

At 33% - Adds: a molten steel mound - Indifferent, stationary spawns from south; incrementally towards the north.  DMG AURA, that GROWS in strength the longer it's alive.  RANGE DPS ONLY - Avoid aura, it will kill you fast! 

Assigned Molten Group #7 - Position NORTH SIDE of the hump/aquaduct; adjust your view-angle (3rd person, F9 to toggle), to see OVER the hump and gain Line-of-Sight at moltens in order to range DPS.

Both adds continue to spawn for the duration of the event.

Everyone else, assist MA please when called on.

Shards, Guns, Carts & Tower - Ssark is handling this area.  Assigned players to loot shards, and handle cart/tower moves.


Boss - Avatar of Steel

Hits: 23500
Abilities: AE Rampage
AE:

Crushing Swipe - PBAE 60k DD (200' Range)
Gathering of Destruction - PBAE 10k DD + Slow Push (1000' Range, 20 Curse Cntrs)
Gravity of Steel - 20k DD + Slow Push (Single-Target, 45 Curse Cntrs)
Rumble of Mountains - PBAE 25k DD (1000' Range)
Steel Absorption - 75k DD (Single-Target)


Adds - Quick Overview


* Note: For any/all adds.  Please test/report for mob weaknesses (weapon types, casters DD's (fire, cold etc), and report.
   

MOB        DETAILS
a steel pattern Spawn under Avatar at 69% and onward, and path.
(a recreation of steel) Will morph into a recreation of steel on player direct contact
    Patterns will not show up on Extended Target Window (ETW)
    Morphed recreations of steel hit for 17k
   
    * Required Actions
    RANGE DPS only as assigned
    CC: recreation of steel are mezzable & stunnable.
   
   
a molten steel mound Spawn at 33% and onward (starting south to north).
Stationary.  Non-confrontational Ooze type.
DD AURA Around it, powers up over time.
   
    * Required Actions
    RANGE DPS ONLY: By assignment (individual and/or group)


Bolt Guns
 
Clickable to fire bolts at the Avatar, which spawn adds.

Guns are located on the ledges, on either side of the spiral ramp, spanning multiple levels.


Water Tower Platform & Catapult

Catapult launches player onto the floating platform. 

Shards are used to power/move the platform, over Avatar of Steel.

Water spills onto teh Avatar, making it vulnerable to explosions from the carts.

Shock of steel adds most likely spawn as a result of this action above.

ONLY TWO PEOPLE allowed up in the tower, or 75k AE Steel Absorption will fire.


Carts & Explosives
  • Delegated duty, for selected players. 
  • There's a cart located North, and South.
  • Each has explosives on it.  They're powered by the shards.
  • ONLY ONE PERSON on the cart at a time, otherwise 75k DD hits.
AE Entities

Name: a fiery blast
AE: Unknown

Come into play for individuals on the floating platform possibly.  Test/report.

These are potentially attackable/killable, and/or non-confrontational.  Test/report results.

Keep an eye open for these floating around in the sky or something.  They maybe tied to floating tower, and/or just casting AE's at us once and a while.


Text / Audio Triggers - Mandatory

Avatar of Steel - AE EMOTE: ALL Mandatory setup

Crushing Swipe (60k PBAE), goes off every 35 seconds approximately.   There's a warning emote, allowing 5 seconds to HIDE and avoid the DD.

Emote Trigger argath-swipe.gtt

Audio File: run-hide.wav


Avatar of Steel - VULNERABLE STATES: ALL Mandatory setup

Everyone needs to setup these, so you know WHEN to attack/DPS Avatar efficiently.

MELEE Vulnerable state: is cooled by the water cascading from the tower
CASTER Vulnerable state: magical protection crumbles in the massive explosion

Emote Trigger argath-vuln.gtt

Audio Files:

melee-vuln
caster-vuln


Steel Pattern Spawn Emote: ALL Mandatory setup

At around 69% and onward, these spawn with a warning emote.

Emote Trigger argath-pattern.gtt

Audio File: Alert5.wav


Gravity of Steel: Avatar MAIN TANKS

At times, you'll be hit with the cart AE/DoT when it's in play: Gravity of Steel - 20k DD + Slow Push (Single-Target, 45 Curse Counters)

This causes extra spike damage in addition to the regular 60k AE Crushing Swipe.

Make a /rs, /shout, /ooc hotkey to give Paladins/Healers a heads up for SPLASH & CURSE CURE. 

Paladins can splash at you and cure from a distance.  A designated healer can act as backup/safety cure.

Emote Trigger argath-cart.gtt

Audio File: get-cured.wav

1337
Upcoming Events & Strategy / HoT - SS7 - Morell Ascendant
« on: August 15, 2012, 10:05:37 PM »
 
Sanctum Somnium - #7 - Morell Ascendant


Zone & Instance Info
 
Gather Zone: Sanctum Somnium

NPC Name: Towerguard Raena
NPC Location: She's located on the balcony across from the zone-in.

Keyword to Enter: fight


Flag & Key Requirements
 
Zone Flag: Group zone access to Morell's Castle
Event Key: Sanctum Key
Event Flags: Completion of the FIVE Tier 3 raids:
Guardian of the House
At World's End
Force of Eternity
  Cazic's Final Stand
  The Awakening
 
* Minimum Piggy/85'/push into raid: None


Brief Event Overview and Strat

Stage 1 - Assist MA on Wisps, and take Morell Thule down to 50% to despawn.

Once at 50%, Morell Thule respawns in the Northeastern area.

Stage 2 - Wisps respawn, we kill again, and clear any trash to reach Morell Thule in the NE area.

When Morell Thule reaches 20% Health, use your Staff of Arcane Dispossession (from group mission) to take his power away and win the event.

Any questions, please ask in the FLRaids:raids channel.  Thanks.


Morell Thule

Hits for 25000; AE Rampages.
 
AEs: Stage 1 version
Morell's Gift of Darkness - Blindness
Morell's Distraction (Dreamsapper Blast) - 30k DD
Morell's Compulsion - Push/Pull, with 15-30k DD
Curse of Morell Thule - 5-10k DoT + Mana/HP Drain
Morell's Prevention - Self buff, Haste + DS (1tck emote based)
   

AEs: Stage 2 version (in addition to above)
Dream Fetters - 25k DoT + Snare (single-target, 4 tick duration)
Dreadful Curse of Morell Thule - 10-20k DoT + Mana/HP Drain
Morell-Touch I - DT (from failure to click)


Wisps

  • Six wisps located in the gazebo go active at timed intervals.
  • Once killed, tehy do not respawn.
  • Hit for 18000
  • Wisp names and AEs vary.
 
Trash Adds

Various rabbits, satyrs and unicorns spawn during first stage.

Hit for 12000 - 16000

Mezzable and stunnable

Note: During stage 2, we'll be killing some of these to clear a route to Morell Thules respawn spot to the Northeast.


1338
Upcoming Events & Strategy / HoT - SS6 - The Cages of Testing
« on: August 15, 2012, 10:04:57 PM »
 
Sanctum Somnium - #6 - The Cages of Testing


Zone & Instance Info
 
Gather Zone: Sanctum Somnium

NPC Name: Towerguard Raena
NPC Location: She's located on the balcony across from the zone-in.

Keyword to Enter: fight


Flag & Key Requirements
 
Zone Flag: Group zone access to Morell's Castle
Event Key: Sanctum Key
Event Flags: Completion of the FIVE Tier 3 raids:
Guardian of the House
At World's End
Force of Eternity
  Cazic's Final Stand
  The Awakening
 
* Minimum Piggy/85'/push into raid: None


Brief Event Overview and Strat

Stage 1 - Assist MA to kill adds as they spawn.  Assigned casters loot Lens of Ire.  Melee DPS/Tanks loot Phylactery of Dreams.

Stage 2 - React to emotes or be DT'd. 

Stage 3:

Fabracata will be CASTER tanked, with assigned lineup (use Lens to hold agro when you are tanking).

Kill Apparition adds using their weaknesses: Fears, Stuns, Charms, Snares.

When you get ported, kill the visage familiar in your cage to be ported back to the raid.

Move away from Fabracata when your Barrier emote trigger fires.

Assist MA to kill Dougs and Living Insanity mobs.  Use Charm clicky against Ageless; then sick them on MA target or Fabracata.

ALL Trigger information is available on the forums, Strategy section, SS6 - The Cages of Testing post at: forums.eqfreelance.net

Any questions, please ask in the FLRaids:raids channel.  Thanks.


Stage 1 - Adds

Once the event begins, adds spawn two at a time.  Killing them spawns the next set of adds.

Adds hit for 13000, and consist of random names and have various AEs.


ITEM DROPS

Each add drops TWO items:

Lens of Ire - Aggro Click (assigned pure casters only loot these)

Phylactery of Dreams - Charm click (melee dps / tanks loot these).


Stage 2 - Calibo, the Underlord of Dreams

When the adds are dead or our timer elapses, which ever comes first; Calibo a large puppet boss spawns.

Hits for 23000.

DT EMOTES - Included in related trigger section further down in the post.


Stage 3 - Fabracata, Lord of Unreality

This is the final event boss.

* Special trait: Hits pure caster classes only for 10000.  But hits everyone else 24000.  Powers up over time.

Assigned pure casters who looted a Lens of Ire earlier will be in an Main Tank order against Fabracata.  Use the clicky to help hold agro.


ADDS

Use the following methods outlined below to kill them.
          
a charming apparition CHARM Clicky, or CHARM SPELLS
  a fearsome apparition FEAR Spells
  a stunning apparition STUN Spells
  a troublesome apparition SNARES
     

JAIL PORTING

Randomly 6-7 players are targeted and sent to surrounding cages.  They have to KILL a visage of themselves in order to be ported back out.


LORD DOUG

Adds by this name spawn randomly, hit for 16000.  Assist MA and kill when they spawn.

They are Rootable/snarable (but not mezzable/stunnable).


THE BARRIER

At some random point, Fabracata gives a warning emote followed shortly after by: Barrior of Insanity PBAE 100000 (25 range). 

Avoidable at max melee range, and/or beyond 25' range.

Emote Pattern: The air crackles as Fabracata begins to cast Barrier of Insanity. You should run away!

Note: Main Tank (caster), summon tank during this stage to increase odds of avoiding it.


LIVING INSANITY & AGELESS HORROR ADDS

These spawn each time the barrier happens.

Living Insanities - Assist MA and kill (they hit for 18000, immune to all forms of cc).

Ageless Horrors - Use Phylactery of Dreams to CHARM them permanently (they will then hit for 60000).


Text / Audio Triggers - Mandatory


ALL Mandatory Setup

Edit the following trigger: casts his gaze at YOURNAME and prepares to charge

Replace YOURNAME with your character name.


GTT All-in-One Puppy: hot_ss6.gtt

Audio File:

Alert5.wav
runaway.wav
move-away.wav
you_were_successful.wav

* get-close-to-calibo.wav
* run-run-run-do-not-let-calibo-catch-you.wav

1339
Upcoming Events & Strategy / HoT - SS5 - Elements of a Dream
« on: August 11, 2012, 11:43:27 PM »
 
Sanctum Somnium - #5 - Elements of a Dream
*[08/17/2012] NOTICE: This post has been modified to reflect amendments posted within this thread *
 

Zone & Instance Info
 
Gather Zone: Sanctum Somnium

NPC Name: Towerguard Raena
NPC Location: She's located on the balcony across from the zone-in.

Keyword to Enter: fight


Flag & Key Requirements
 
Zone Flag: Group zone access to Morell's Castle
Event Key: Sanctum Key
Event Flags: Completion of the FIVE Tier 3 raids:
Guardian of the House
At World's End
Force of Eternity
  Cazic's Final Stand
  The Awakening
 
* Minimum Piggy/85'/push into raid: None


Brief Event Overview and Strat

For this event, we must deal with constant timed adds while completing puzzles to advance our progress.

Each Arena stage has roaming orbs that don't hit back but will explode various AE's when run over or touched.  Avoid them!

Select players will be tasked with looting ground spawn items that aid our efforts on certain adds for different stages.  Please don't loot anything unless told to do so please.

Assigned puzzle solvers join FLPuzzle:puzzle channel.

PUPPET DPS:
    DPS within select group numbers will be assigned a direction: South, West, North

    You are to go to the DOOR according to your assignment.  Once the event BEGINS, the door will be unlocked and you enter the hallway area.  Puppets spawn here, and path towards your puzzle solver who is located inside a room further in.

    RANGE DPS ONLY to kill the puppets as FAST AS POSSIBLE. 

    Druids, if you end up in a Puppet DPS group, you are to DPS (nuke, not joking), to help kill as well.  You are also backup Caller in case a puppet kills your puzzler.

    Enchanters, you can lurch puppets to prevent them from pathing.  Rangers, don't use punt; as it only causes the puppet to warp.
MAIN RAID AREA:

Stage 1 = Assist MA to Kill Dream Avatars.

Stage 2 = Assist MA to kill LOW HP 3% ones FIRST.  Kiting 100% ones until they drop to 3% by proper essence click.

Stage 3 = Assist MA to kill Dream Champions.  Essence clickers will prep these with different essences to reduce select resists. 

Final Boss Stage: The Dream Master's Avatar - BURN him down.  Tanks use discs and OT any adds that spawn.

Dream Master color changes indicate spell weaknesses: Normal color, use FIRE.  Green use Corruption.  Blue use Poison.  Red use ICE.

Any questions, please ask in the FLRaids:raids channel.  Thanks.


Sleeping Puppets

Select DPS will be assigned to kill these for all stages they are in play.
  • Puppets don't hit back, but instead path towards players in the colored pad puzzle rooms, and DT them.
  • Spawn 1-2 at a time in the hallways depending on stage.

The Arena

Each stage is associated with a Puzzle. 

As long as the puzzle is unsolved, we must deal with four adds of various types; spawning every minute.

They all hit for 11000 - 13000 range.

There's tricks to different mobs and how we'll deal with them as well for EACH stage.  Pay close attention please!


STAGE 1

Dream Avatars:

  • Scavenger's Saliva - 20k DoT (single-target, corruption cures)
  • COLORED ORBS spawn and float around the arena.  They don't hit back, but going near one causes it to explode.
  • Basic Orb: 20k PBAE DD (Energy Discharge)
  • Gravity Orb: Slow Push (Gravity Essence)

STAGE 2

Dream Avengers:
  • Flame Fist - 25k DD + Knockback/up (single-target)
     
  • They also mem-blur (but read below for counteraction details)
  • Mix of Avengers spawn at 3% HP, others at 100%.  We want to kill the LOW HP ones (3%).
  • When a low HP Avenger dies, it drops an item on the ground.  Certain colors used against each Avenger will do 97% Damage to them:

 
Green Avenger Essences -> use against BLUE dream avengers
White Avenger Essences -> use against: GREEN dream avengers
Blue Avenger Essences -> use against: RED dream avengers
Red Avenger Essences -> use against: WHITE dream avengers
 
* GTT ref /con clicks to colors include below in related trigger section.
 
  • Colored intermediate orbs also spawn during this stage.  Avoid them or be stunned (Essence of Health)
STAGE 3

Dream Champions:
  • Green Visage - Endurance Drain + 4k DoT + Treant illusion (single-target, curse counter 5)

  • Blue Visage - Mana Drain + Turepta illusion (single-target, curse counter 5)

  • White Visage - AC reduction + Giant Floating Skull illusion (single-target, curse counter 5)

  • Red Visage - Cap HP 85% + Red Nekhon illusion (single-target, curse counter 5)
     
  • Puppets during this stage drop click items we can use to reduce resistance on select colored Dream Champions as follows:

 
Greater Blue Essences -> use against RED dream champions (reduces cold resist)
Greater White Essences -> use against GREEN dream champions (reduces curruption resist)
Greater Green Essences -> use against BLUE dream champions (reduces poison resist)
Greater Red Essences -> use against WHITE dream champions (reduces fire resist)

* GTT ref /con clicks to colors included below in related trigger section.
 
  • Colored orbs also spawn during this stage, and work just like prior stages.  Avoid them:


Advanced Orbs:
Blue Eruption - PBAE 5k DoT + Stun (6s)
Green Eruption - 3k DoT + Root
Red Eruption - 9k DoT PBAE (30' range)
White Eruption - SILENCE + Snare

Stun Orb: Casts stun (of course! Stun Essence 30s duration)
[/list]

The Dream Master's Avatar

Final boss stage.

  • Hits for 24000; AE Rampages (full damage)
  • Burn boss.  Tanks disc and OT any adds that spawn.
  • Color of Dream Master indicates spell weakness as follows:
    • Normal color = USE FIRE
      Green = Use Corruption
      Blue = Use Poison
      Red = Use ICE


The Puzzles
 
Stages 1, 2, 3 above all have a related puzzle that must be solved to advance to the next stage.

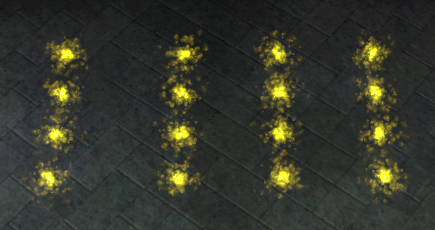
  • Each puzzle area has four colored pads: Red, Blue, White, and Green
  • A pad is turned on or off by stepping on it.

PUZZLE 1

In-game Lore/Text:
The Dream Master shouts 'I will only give you so long to complete my challenges. The flames in front of me represent the time you have left. If you kill my avatars, I will extend your time. Now, I am thinking of four colors. Can you guess which ones?'

The Dream Master shouts 'Go! Find the colored buttons and see if you discover the colors in my mind! If you must, you may ask me for a [hint]'

You say, 'Give us a hint'

The Dream Master says 'Come, now this is the easy one! I want you to guess one color for each room. Make your choices by stepping on a colored button. When each room has made their choice, I will tell you how many you got right.'


PROBLEM: Dream Master thinking of FOUR colors; we have to guess which color for each room.

SOLUTION:

When all four puzzle solvers step on a pad; The Dream Master will emote how many we have correct.  From there, each puzzle solver will have to figure out which color is theirs; one at a time.

Center solver figure out theirs first, then South, then West, then North.

    Each puzzle solver steps onto their red pad.
     
    The Dream Master emotes how many you have correct.

    If it's 0, you know that no one's color is red, so everyone moves to their blue pad.

    If you only have 1, 2, or 3 correct, everyone steps off their red pad.

    The center solver steps onto the blue pad; the other three step back onto their red pad.

    You'll get another emote about how many you have correct.
     
      If the number correct
decreases, everyone steps back off their pads.
 
    The center solver moves back to the red pad (since the correct number decreased, you know the previous pad you were on to be the correct one).
 
If the number correct stays the same, everyone steps back off their pads.
 
    The center solver steps onto the white pad (since the correct number stayed the same, you know neither the red pad nor the blue pad was the correct one); the other three step back onto their red pad.
 
If the number correct increases, you know the center pad is now correct and the next solver can use the same method to figure out their color. [/list][/list]


Example1:

    Everyone starts off on red.
      Emote says you have 1 correct; everyone steps off their pads.
    The center solver moves to blue; the other three step back on red.
      Emote says you have 1 correct; everyone steps off their pads.
    The center solver moves to white; the other three step back on red.
      Emote says you have 2 correct; everyone steps off their pads.
        The center solver now knows their correct pad is the white one.
    The south solver moves to blue; center solver steps back on white; the remaining two step back on red.
      Emote says you have 1 correct; everyone steps off their pads.
        The south solver now knows their correct pad is the red one.
    The west solver moves to blue; center solver steps back on white; south solver back on red; north solver back on red.
      Emote says you have 2 correct; everyone steps off their pads.
    The west solver moves to white; center back on white; south back on red; north back on red.
      Emote says you have 3 correct; everyone steps off their pads.
        The west solver now knows heir correct pad is the white one.
    The north solver moves to blue; center back on white; south back on red; west back on white.
      You get an emote finishing the puzzle (center was white; south was red; west was white; north was blue).


PUZZLE 2

In-game Lore/Text:
The Dream Master shouts 'You may have read my mind, but I will control your bodies! Dance for me! Do whatever I say!'

The Dream Master shouts 'I will show you my instructions in each of the rooms. Do you think you can remember them?'

The Dream Master shouts 'Watch the orbs and heed my commands! If you must, you may ask for a [hint]'

You say, 'Give us a hint'

The Dream Master says 'In each room I will display a different series of colors. Adventurers in each room must then step on the buttons in same order as the colors I have shown to you. If the order is wrong in even one room, everyone fails, and I will show the color sequences again.'


PROBLEM:

At the beginning of Stage 2, each puzzle solver must be ready to watch and record the orb's sequence of 15 color changes.

The color changes will be a random order of red, blue, white, and green.

In the middle of each puzzle area is a floating orb.  When lit up, the orb appears like a wisp (like the worry wraiths, or daydreams model).

It will light up for about 2 seconds and then go dark for 2 seconds. Then it will light up for another 2 seconds and then go dark for 2 seconds, repeating itself until it's shown you its entire sequence of 15 colors.

Once the orb is done its display and you've recorded its color changes in sequence, the four puzzle solvers need to step on their pads in that same order. This completes the puzzle.


Be aware:

  • A colored pad needs to be in upright position before one can step on it

 
If a puzzle solver steps on a pad when it's in a downward position; it won't count

This matters when the same color sequence is in play for example: white, white, white.  We have to wait for the white pad to reset each time before stepping back on it.
 
  • If any puzzle solver fails to step on their pads in the proper order, the puzzle resets.

 
If this happens, puzzle solvers must be ready to quickly record the new color order.
[/list]

Failure emote:
    The Dream Master says 'Fail! Adventurers in the main arena stepped on the incorrect sequence!'
    The Dream Master shouts 'If one group fails, everyone does! Try again!'
    The Dream Master shouts 'Watch the orbs and heed my commands!'
    [/list]

    Success emotes, one per related area:
      The Dream Master says 'Good! Adventurers in the main arena remembered the sequence!'
      The Dream Master says 'Good! Adventurers in the south room remembered the sequence!'
      The Dream Master says 'Good! Adventurers in the west room remembered the sequence!'
      The Dream Master says 'Good! Adventurers in the north room remembered the sequence!'
      The Dream Master shouts 'You have not finished my challenge! Defeat your enemies!'
      [/list]


      SOLUTION:

      Puzzle solvers, watch the order of colors.  Write/Type or enter each into a hotkey temporarily.

      Use whatever method works for you.  Short form might be one possible way:

      Using first letter abbreviations (G)reen, (B)lue, (W)hite, (R)ed.  So watching the sequence, you could write it down and group by 5 for easier reading:

      GBBWR BGGRW RRBWW

      Once everyone confirms they have all of the sequence written down in some way, you can all begin doing them.  Everyone can do it at the same time.


      PUZZLE 3

      In-game Lore/Text:
      The Dream Master shouts 'One action causes another. One goes down, and others come up. Can you turn on all of them?'

      The Dream Master shouts 'Adventurers in the adjacent rooms, listen to the instructions of your leader in the main arena.'

      The Dream Master shouts 'Now, prove to me your intellect! If you must, you may ask for a [hint]'

      You say, 'Give us a hint'

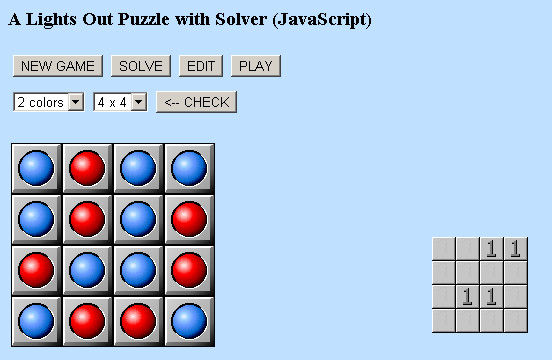
      The Dream Master says 'The grid of orbs corresponds to each of the four button rows. The top row of orbs corresponds to the row of buttons in the main arena. The second row of orbs corresponds to the button row in the south room. The third row of orbs corresponds to the button row in the west room. The last row corresponds to the north room. Each column of orbs, from left to right, corresponds to the button colors: green, white, blue, and red. Whenever you step on a button, you toggle that button's state, as well as the states of the buttons above, below, to the left, and to the right. When a button goes down, the orb on the grid corresponding that button will light up. Your goal is to turn on all the lights.'


      PROBLEM:

      SOLUTION:

      Shortly after the start of Stage 3, the Center puzzle solver will see 16 orbs (4 by 4 rows and columns).  Some will be ON, some OFF. 

      This is puzzle based on "Lights Out", except we want to turn the lights on.  But the concept is the same: Step on a pad, and all the adjacent ones that are OFF, turn ON, and lights that were ON, turn OFF.

      Easiest way is using the Allahkazam screenshots and muddle through the rest with steps and an example.  There's a Javascript link also, I'll reference further down.


      Example1: This is how the puzzle MIGHT LOOK to start out


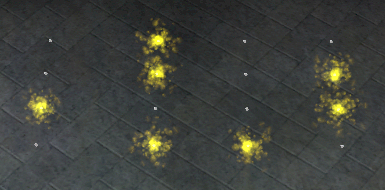
      With the above labeled, and facing EAST, it is as follows:


      Using the above example, the following pads are OFF:

      Center: Green, Blue, Red
      South: Green Blue
      West: White, Blue
      North: Green Red


      The center puzzle solver needs to co-ordinate with the three other solvers to light up the entire grid of orbs.

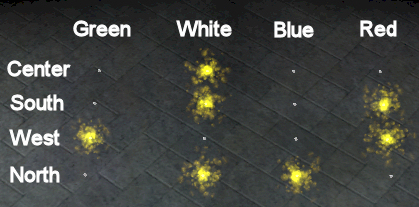
      This is how we need the final puzzle to look:


      Source: Allahazams


      Solving it:

      There's a couple ways to go about solving this puzzle.  But we want to do it in the LEAST amount of time/moves.

      Easiest way, is to use this LIGHTS OUT PUZZLE SOLVER javascript page.

      Steps:
      [olist]
      • Load page, select 4x4 grid from pull down.
      • Click EDIT twice to make them all blue.  This mode allows you to turn colors on/off without any others changing.
      • Match the in-game view.  Click squares RED that show ON (as wisps) in-game.
      • Once you have it matching, click the SOLVE button.
      • A binary grid pop up will appear for your solution.  Blank squares = 0's.  1's = Pads that need to be stepped on
      • [/olist]


        Using our above example:


      Breakdown solution:


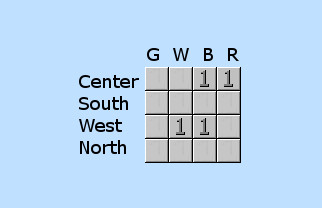
      Looks like we can do this one in only FOUR moves:

      Center = Blue, Red
      South = None
      West = White, Blue
      North = None
       

      Applying solution:

      Order matters!  Each person must complete their step (if any) before the next proceeds.

      Order is: Center, South, West, North.

      Let's work through the example to play it out:

      [olist]
      • Center steps on BLUE, then RED.  Then tells WEST to go (south is skipped because there's nothing to do)
      • West steps on WHITE, then BLUE.  That should complete the puzzle.  North is skipped because there's nothing to do.
      • [/olist]
        Note: You can step on pads when they are pressed down and it works.  This is the only puzzle that works like this.  So try not to run over other pads en route to the one you're after.


      Text / Audio Triggers
      [/size]

      NONE


      1340
      Upcoming Events & Strategy / HoT - SS4 - Islands of Sand
      « on: August 10, 2012, 09:47:19 PM »
       
      Sanctum Somnium - #4 - Islands of Sand
      [/size]


      Zone & Instance Info
       
      Gather Zone: Sanctum Somnium

      NPC Name: Towerguard Raena
      NPC Location: She's located on the balcony across from the zone-in.

      Keyword to Enter: fight


      Flag & Key Requirements
       
                                              
      Zone Flag: Group zone access to Morell's Castle
      Event Key: Sanctum Key
      Event Flags: Completion of the FIVE Tier 3 raids:
      Guardian of the House
      At World's End
      Force of Eternity
        Cazic's Final Stand
        The Awakening
       
      * Minimum Piggy/85'/push into raid: None


      Brief Event Overview and Strat

      For this event, as we kill each Dervish, FOUR tornadoes spawn in the middle and rush towards where the dervish died.

      We must AVOID THE TORNADOES or be DEATH TOUCHED.

      The Tornadoes spawn from middle, and fan out towards where the Dervish died.  Run away accordingly; based on your position to avoid being DT'd.

      Once all five dervishes are killed, Lord Silifore spawns.  Assist MA when called on.

      Splash heavy during Lord Silifore please; lots of AE's in play.

      Any questions, please ask in the FLRaids:raids channel.  Thanks.


      Dervishes & Tornadoes

      As we kill each Dervish, FOUR tornadoes spawn in the middle and rush towards where the dervish died.

      We must AVOID THE TORNADOES or be DEATH TOUCHED.

      Dervish Details:
      • Hit for 24000

       
      • Blinding Breeze - 25k DoT + Decrease Mana Pool + Blind (single-target, RNG targets)
      Lord Silifore

      After the 5th Dervish dies, Silifore spawns near the port-up location.

      • Hits for 24000


      Text / Audio Triggers - Mandatory
      [/size]


      ALL Mandatory Setup

      Warning when Tornadoes spawn to look out and avoid them or be Death Touched.

      GTT All-in-One Puppy: hot_ss4.gtt

      Audio File:

      Alert5.wav


      1341
      Upcoming Events & Strategy / HoT - SS3 - Under the Sea
      « on: August 10, 2012, 09:46:02 PM »
       
      Sanctum Somnium - #3 - Under the Sea
      [/size]


      Zone & Instance Info
       
      Gather Zone: Sanctum Somnium

      NPC Name: Towerguard Raena
      NPC Location: She's located on the balcony across from the zone-in.

      Keyword to Enter: fight


      Flag & Key Requirements
       
                                              
      Zone Flag: Group zone access to Morell's Castle
      Event Key: Sanctum Key
      Event Flags: Completion of the FIVE Tier 3 raids:
      Guardian of the House
      At World's End
      Force of Eternity
        Cazic's Final Stand
        The Awakening

      * Minimum Piggy/85'/push into raid: None


      Brief Event Overview and Strat

      Assist MA as we pull and kill each miniboss and various adds. 

      Once the 5th miniboss is dead, The Deepsea Leviathan spawns.  Assist MA as we burn it down.

      Straight forward event, with a couple AEs from Leviathan.

      Once The Deepsea Leviathan dies; run up to Mersela and say "Leave", to be ported OUT of the instance in order to remove the Drown effect.  Then run back to base camp in the water again, or advance to the next event area if you're not opting in on loot.

      For loot, we'll do out of range of Sharks.  When done, we'll kite sharks briefly to allow winners to loot their items.

      Any questions, please ask in the FLRaids:raids channel.  Thanks.


      Sharks, Bait and Hand-ins

      We collect bait from boxes around the event area.  Each bait hand-in activates the related mermaid miniboss.

      • Hit for 24000

       
      • Straight up melee, no specials/aes.

      Hand-in to Shark Name:
        A Pile of Shrimp is given to a kraken.
        A Sack of Bloody Fish Heads is given to a hammerhead shark.
        A Slab of Seal Meat is given to a great white shark.
        Herring is given to a deadly anglerfish.
        Tuna is given to a hungry regrua.
      GTT - Mob /con to related bait item: hot_ss3.gtt

      Note: The triggers I made above are merely to aid whoever we task with bait hand-in duty.


      The Deepsea Leviathan

      When all five mermaids are dead, Leviathan spawns.

      • Hits for 24000

       
      • Tail Slap - 33k DD + Casting Interrupt + Stun
         
      • Devastating Wound - 25k DoT -240 AC (single-target, 5 min duration, detri)
         
      • Drown - Negates Enduring Breath Effect

      1342
      Upcoming Events & Strategy / HoT - SS2 - The Essence of Dreams
      « on: August 10, 2012, 09:42:26 PM »
       
      Sanctum Somnium - #2 - The Essence of Dreams
      [/size]


      Zone & Instance Info
       
      Gather Zone: Sanctum Somnium

      NPC Name: Towerguard Raena
      NPC Location: She's located on the balcony across from the zone-in.

      Keyword to Enter: fight


      Flag & Key Requirements
       
                                              
      Zone Flag: Group zone access to Morell's Castle
      Event Key: Sanctum Key
      Event Flags: Completion of the FIVE Tier 3 raids:
      Guardian of the House
      At World's End
      Force of Eternity
        Cazic's Final Stand
        The Awakening
       
      * Minimum Piggy/85'/push into raid: None


      Brief Event Overview and Strat

      Shadow of the Heart spawns a miniboss at 100%, 50%, and 25% intervals.

      She also casts a long MEZ + Stunspin.  Paladin Splash, RC AA, or Pure Spirit can remove.

      Each Miniboss AE's a long MEZ

      Every 35 seconds Shadow adds spawn and must be killed.  These proc the MEZ as well.

      Assist MA when called on, and RANGE DPS to avoid the mez!

      Any questions, please ask in the FLRaids:raids channel.  Thanks.


      Shadow of the Heart

      • Hits for 22000

       
      • Shadow of Dreams 3x spawn on engage, and every 35 seconds.  They hit for 8500, and proc MEZ spell (Quiet Slumber)
         
      • At 100% HP, Dream Harvester spawns.

       
      • At 50% HP, Dream Reaver miniboss spawns.

       
      • At 25% HP, Dream Destroyer miniboss spawns.

      Shadow of the Heart AEs:
      Minibosses

      All of these hit for 13000, and proc MEZ (Quiet Slumber).

      In addition to the proc mez, each has its own flavour of AE also.


      DREAM HARVESTER: Harvest Dreams - 500 Mana Drain DoT (single-target).

      DREAM REAVER: Reave Dreams - 25k DoT + MELEE SLOW + Snare

      DREAM DESTROYER: Destroy Dreams - 35k DD PBAE (25' range)


      Text / Audio Triggers - Mandatory
      [/size]


      ALL Mandatory Setup

      For when adds spawn, it's good to have a heads up.

      GTT All-in-One Puppy: hot_ss2.gtt

      Audio File:

      Alert5.wav


      1343
      Upcoming Events & Strategy / HoT - SS1 - Taking the Tower
      « on: August 10, 2012, 09:41:07 PM »
       
      Sanctum Somnium - #1 - Taking the Tower
      [/size]


      Zone & Instance Info
       
      Gather Zone: Sanctum Somnium

      NPC Name: Towerguard Raena
      NPC Location: She's located on the balcony across from the zone-in.

      Keyword to Enter: fight


      Flag & Key Requirements
       
                                              
      Zone Flag: Group zone access to Morell's Castle
      Event Key: Sanctum Key
      Event Flags: Completion of the FIVE Tier 3 raids:
      Guardian of the House
      At World's End
      Force of Eternity
        Cazic's Final Stand
        The Awakening
       
      * Minimum Piggy/85'/push into raid: None


      Brief Event Overview and Strat

      Know your group number please, as you'll be split up and assigned to different areas.  Thanks.

      We'll split up, and crawl through each area of the maze killing various rotdogs encountered.  Stun/Mez and assist MA for these.

      Eventually, we'll all meet up and take on The Executioner. 

      The Executioner targets players with a DT.  You must get curse cured within 10 seconds or die.

      When Executioner is dead, we'll med up and take on the next stage of the event.

      Stage 2:  Three  Minibosses, with friends and Emotes

      Assist MA for this stage, as we take on each Miniboss, but killing the adds first.

      Watch your emotes please!  Aside from the DT, there's a nasty Viral AE that must not be spread, get cured when your trigger fires.


      Stage 1 - Maze Rotdogs & The Executioner

      Groups will be split up, and work their way through different areas of the maze, encountering rotdogs along the way which need to be killed.

      ROTDOGS:
      • Hit for 17000

       
      • Mezzable

       
      • Stunnable
       
      THE EXECUTIONER:
      • Hits for 22000

       
      • AE: Judgement - 31k DD + Snare (200' range)
         
      • AE: Punishment - SILENCE + Reduce mana pool by 7200
         
      • DT EMOTE: Players targeted for DT; must be Curse cured within 10 seconds or death occurs.


      Stage 2 - The Watcher, Master Hemlock, Lawman Rurk

      We kill each Miniboss to spawn the next.

      Be aware, a couple minibosses have an emote/mechanic we have to deal with.


      THE WATCHER:

      • Hits for 22000

       
      • AE: Lurid Gaze  - SILENCE + 42k DD
         
      • AE: Inner Fear - Self Buff, Spell Reflect chance + Haste increase for boss.
         
      • Spawns stealthy assassin adds at 75% and 25% Health.  Adds hit for 17000.  Stunnable!  But immune to mez.

      MASTER HEMLOCK:

      This one spawns along with two guards.  Longer the guards remain alive, the stronger Hemlock gets.  Guards hit for 20k.

      • Hemlock Hits for 22500

       
      • Random players targeted with: Reduction Melee SLOW + 39k DD + Mana Pool Reduction 5300 + Shrink
         
      • AE: Surge of Light - Mana / Endurance DRAIN + DD 29k + Banishment (pushes you around the room).
      LAWMAN RURK:
      • Hits for 24000

       
      • Targets players with Dismissal (DD + chance to proc FEAR)
         
      • Lawman's Blight (26k DoT)  targets random players.  6 seconds to cure, or everyone nearby gets: Plagued Mutation (Mana drain + Melee/Spell slow).
         
      • Spawns adds at 65% and 25% health.  Plagued Mosquitos = Mezzable and Stunnable.  Mutated Gnats = Unmezzable, but stunnable.

       
      Adds spawning emote: Gnats and mosquitoes begin to swarm around you.

      [/list]

      Text / Audio Triggers - Mandatory
      [/size]

      ALL Mandatory Setup

      GTT All-in-One Puppy: hot_ss1.gtt

      Audio Files:

      Alert5.wav
      get-cured.wav
      disease-cure.wav

      1344
      Upcoming Events & Strategy / HoT - Morell's Castle - The Awakening
      « on: June 22, 2012, 09:38:42 PM »
       
      Morell's Castle - The Awakening
      [/size]


      Zone & Instance Info
       
      Gather Zone: Morell's Castle

      NPC Name: Towerguard Melbur
      NPC Location: At the bottom of the steps that lead up to Sanctum Somnium.

      Keyword to Enter: ready [ TBA inside different areas require keywords to reach based on split setup at raid time ]


      Flag & Key Requirements
       
                     
      Zone Flag: Group zone access to Morell's Castle
      Event Key: None
      Event Flag: Completion of the other four Tier 3 raids (Guardian of the House; At World's End; Force of Eternity; Cazic's Final Stand)


      Brief Event Overview and Strat

      * Mandatory Audio/Text GTT Trigger information is available in the GTT section further down in this post.

      This event takes place in two main stages.

      Know your group number please - As there are THREE separate areas to complete, each requiring special keywords to enter.

      STAGE 1:
        Three minibosses must be killed within 60 seconds of each other.  Do not loot any items unless tasked to do so.
         
        Watch /rs for the co-ordinated final kill call.

      STAGE 2:
        Dreamleech boss + Adds, and Random players targeted with massive DoTs that only sceptor holders can cure you!
         
        Each DoT can only be cured with the proper sceptor clicky.  Our sceptor holders will target and cure based  on YOUR TELL ONLY.
         
        When DoT'ed = You /tell the proper person required to cure your DoT.  Use the GTT overlays as a reminder who has what sceptor.  Do not be a clown and just stand around getting killed.  The DoTs are no joke; long duration with massive DMG/Effects (Slow, Silence, Mana Drain).
         
        At various HP of Dreamleech, adds come into play.  Assist your assigned MA please.
         
        At 60% Dreamleech changes - We need everyone to BACK OFF at this stage and only assist MA on the dream devourer adds that spawn and attack us.  Designated SUIT players will deal with Dreamleech as instructed.
      Any questions, please reply to this thread, and/or ask in the FLRaids:raids channel.  Thanks.


      Stage 1 -  Sandman, Nyade, and Dradir

      • All hit for 17000 - 19000.  No specials.

       
      • All three must be killed within 60 seconds of each other.

       
      • Related AEs target random players, and AE their location.  You don't want to be near others when it happens.  Spread out to avoid being caught by targeted players.
       
                spacer     spacer               spacer     spacer               
      THE SANDMAN       Sandstorm - 40k DD + Melee SLOW, Melee SILENCE
      (Sand area) (cast every 40 seconds on a random player)
         
         
      NYADE Tidal Wave - 38k DD + Melee SLOW & SILENCE, Caster SILENCE
      (Water area) (cast every 40 seconds on a random player)
         
         
      DRADIR Dradir's Fury - 42k DD + SNARE + 3k MANA DRAIN DoT
      (Forest area) (cast every 20 seconds on a random player)


      Stage 2 - Xaendar the Dreamleech

      • Hits for 22000; flurries.

       
      • He shadowsteps to random locations.

       
      • Emotes players, who must get out of line-of-sight, or be hit with massive damage (Searing Vision).
         
      • Targets players every 20 seconds with a mix of SLOW, SILENCE, MANA DRAINs AEs.  Special item clicks used in Stage 1  cure each effect.
       
                     spacer     spacer     spacer     spacer     spacer                         spacer          spacer     spacer     spacer     spacer     spacer     spacer     spacer          There's no AEs during this stage          spacer     spacer     spacer     spacer     spacer     spacer     spacer                    spacer     spacer     
      AEs       Dreams of Darkness - 22k DoT + Melee & Caster SILENCE
      Dreams of Drowning - 22k DoT + Snare + Melee & Caster SILENCE + 3k MANA DRAIN DoT
      Dreams of Stifling Sands - 22k DoT + Melee & Caster SILENCE
         
          * Required Actions
          Get proper click cured from designated player(s).
         
         
      100% - 60%
       
      a sleepwalker Spawn at outer part of event area
        (non-confrontational) Path towards inactive puppets around perimeter
         
        a puppet Goes active if a sleepwalker reaches it.
          Hits for 16000
           
          * Required Actions
          Assigned groups KILL Sleepwalkers before they reach puppets
          Enc: Mez puppets IF we fall behind on them.
         
         
      60% - 49%
       
      a dream devourer Hit for 17500; Single-target Rampage
         
          * Required Actions
          Stay away from the Armored Suits located around the room
          Designated players will use suits against Xaendar
          Everyone else: Assist MA please.
         
         
      49% - 0% AEs back in play again
      Sleepwalker adds in play again
          * Required Actions
          Assist your assigned MA(s) for adds/Xaendar


      Sceptors & DoT Cure Assignments

      LEAD: Ssark (Eristie)

      Stage 1:
      [list bull-greenarrow]
      • Each miniboss drops a sceptor.  It has a right-click effect that is used in Stage 2 to cure players of large DoTs.
      • Three players will be assigned to loot a specific sceptor.
      Stage 2:
      [list bull-redarrow]
      • During this stage, random players will be targeted with large DoTs.  The click-effect on sceptor CURES specific DoTs only.
      • Each player DoT'd is to /tell the correct person with the sceptor that can cure their DoT.
      • Upon receiving the tell, you /rt to target the player and/or manually target them and click your sceptor to cure them.
      Note:
      I've created GTT triggers that correlate each DoT to the appropriate sceptor.  Each looted sceptor will pop up an overlay to remind who looted it.  This way players can glance and look and properly direct the tell (hopefully!).  Refer to GTT area at bottom of post.


                     spacer          spacer          spacer     
      SCEPTOR CLICKY       CURES DoT
       
      The Sandman's Scepter of Dreams Dreams of Stifling Sands - 22k DoT + Melee & Caster SILENCE
         
      Nyade's Scepter of Dreams Dreams of Drowning - 22k DoT + Snare + Melee & Caster SILENCE + 3k MANA DRAIN DoT
         
      Dradir's Scepter of Dreams Dreams of Darkness - 22k DoT + Melee & Caster SILENCE


      Suits of Armor Shrouds
      (Stage 2 - Dreamleech at 60%)

      LEAD: Ssark (Eristie)

      For this stage, we need FOUR individuals.

      Four armor suits appear around the room.  The suits are monster shrouds; activated by running into them.

      Four players using the suits have TWO effects at available to them: A snare, and DD Nuke.

      One player keeps Xaendar snred and kited.  While the other three players use the nukes on him.

      Be aware:  Players in suits, keep your distance and avoid any melee from Xaendar, or you'll die quickly.  If you die shrouded, you lose the suit.

      Note:  Pets can damage Xaendar during this stage.


      Text / Audio Triggers - Mandatory
      [/size]


      ALL Mandatory Setup


      GTT All-in-One Puppy: hot_mc_raid.gtt

      Audio Files:

      * run-hide.wav
      * dradir-sceptor.wav
      * nyades-sceptor.wav
      * sandman-sceptor.wav

       
      Sleepwalker & Puppet Activation Triggers

      To cover Sleepwalkers and Puppets activating.

      Remember, Sleepwalkers activate, and begin to path towards a puppet.  Sleepwalkers do not hit back.  We must kill these before they reach a puppet. 

      GTT Sleeper/Puppet Addon: hot-mc-raid-addon-sleepers-puppets.gtt

      Audio Files: None


      1345
      Upcoming Events & Strategy / HoT - Fear - Cazic's Final Stand
      « on: June 09, 2012, 09:41:45 PM »
       
      Fear - Cazic's Final Stand
      [/size]


      Zone & Instance Info
       
      Gather Zone: Fear Itself

      NPC Name: Gallentin the Adventurer
      NPC Location: -

      Keyword to Enter: ready


      Flag & Key Requirements
       
                     
      Zone Flag: Group zone access to Fear Itself
      Event Key: Tremulous Key
      Event Flag:


      Brief Event Overview and Strat

      * Mandatory Audio/Text GTT Trigger information is available in the GTT section further down in this post.

      This event takes place in two main stages.

      Stage 1: Temples, each with a miniboss and 7-9 adds.  We have 12 mins for this stage before autofail.

      Stage 2: Cazic Thule, with adds, Deathtouch, Fear, and Auras on ground to avoid.  Assist MA as assigned for CT/Adds.

      Reminder: During Stage 2, do not go near the Ring of Fire, or you'll be DT'd.

      Any questions, please reply to this thread, and/or ask in the FLRaids:raids channel.  Thanks.


      Stage 1: Temples of Dread, Fright, Terror and Adds

      • Dread, Fright, Terror hit for 20000

       
      • Adds hit for 15-17000

       
      • Three temples, each contains one miniboss + specific adds (7-9 per temple)

         
      • We have 12 minutes to kill all the trash + minibosses.

       
      • Various associated AEs, Adds and details listed below.
       
                spacer                    spacer     spacer               spacer                    spacer     spacer                    spacer                    spacer     
      DREAD       Tigir's Insects - Melee/Caster SILENCE + Slow + Manadrain (disease 22)
      (northwest temple) Scarab Storm - 12k DD + 1.6k DoT (disease 19)
         
      Adds:
      Amygdalans
      Samhains
         
         
      FRIGHT Boil Blood - 1.4k DoT (single-target)
      (southwest temple) Captured Soul -CHARM (banshee illusion, RNG T. Curse 15)
         
      Adds:
        Wraiths
        Zombies
         
         
      TERROR Frost Breath - 27k DD AE (45' range)
      (southeast temple) Touch of Terror - FEAR (single target, curse 20)
      Specter Lifetap - 26k DD
         
      Adds:
        Boogeymen
        Spectre reavers


      Keeping Cazic Thule Distracted

      When everyone zones in, they get a Dagger of Self-Sacrifice on their cursor.

      Assigned player(s) will use the dagger clicky on adventurer NPCs while avoiding CT in order to distract and prevent him from approaching our raid.

      CT approaches from the north initially when the event begins.

      IF he catches any player (that gets too close), they'll be Death Touched.  Then CT starts summoning players randomly and killing them. 

      Players tasked for this, don't let CT catch you!


      Stage 2: Cazic Thule and Ring of Fire

      This part takes place in several stages of CT Health. 

      • Cazic Thule hits for 22000 (no flurry, no rampage)

       
      • Several EMOTE & DEATHTOUCH penalty mechanics in play.

       
      • Various associated AEs, Adds and details listed below.

                spacer               spacer     spacer          spacer     spacer     spacer          spacer     spacer     spacer     spacer     spacer               
      100% - 30%       Runes of Protection - Rune, self-buff 7m HP Melee and Spell DMG
      (Lock 79% w/lore 65s) Corrosive Trembling - 30k DoT (single-target, corruption 40)
         
        Adds: (specs) Spawn emote: Cazic Thule commands his servants to assist him.
        a defender of Cazic Grave Flame - 32k DD (single-target)
          Grave Frost -33k DD (single-target)
         
        a healer of Cazic Everlasting Fear - Self NPC: 50k Heal per tick
          Fortification of Fear - Self NPC: Rune 90% Melee and Spell Mitigation 500k
         
         
        30% - 4% * Required Actions
          CT lays FEAR & DT AURAS on areas, avoid them!
          Your GTT will warn of this, react/move appropriately


      4% - 0%
      (lore but active after)


      Text / Audio Triggers - Mandatory
      [/size]
      UPDATED: Friday, June 22, 2012

      * Note: These are up to date working triggers.  If you imported prior to June 22, then read the reply post below for directional trigger add-on.  Any questions, please reply to this thread and/or ask in FLRaids:raids channel.  Thanks.

      ALL Mandatory Setup

      During Stage 2 - Cazic Thule

      Directionals AEs:

      Front: Quailing Spirit - Melee/Caster SILENCE + DoT (corruption cures, 40' range).
      Rear: Fearful Awareness - 35k DD (100' range).

      Emotes & DT Penalty

      You'll have to go through each GTT emote after it is imported and replace YOUR_NAME with your character name.

      Pattern: YOUR_NAME, remove four of your enhancement spells
      Action: REMOVE 4 Buffs!

      Pattern: YOUR_NAME, come to me, or you shall suffer
      Action: Get close to CT!

      Pattern: YOUR_NAME, begone from my presence
      Action: Run away!

      Pattern: begone from my presence, YOUR_NAME
      Action: Run away!

      * Penalty for failing ANY of the above = Death touch target who failed.  Anyone around the slacker clown who failed gets Cazic Corruption - 15k DoT, 5 min duration (corruption 35).


      GTT All-in-One Puppy: hot_fear_ct.gtt (remember to EDIT YOUR_NAME!)

      Audio Files:
       
      runaway.wav
      Alert5.wav

      * move_away_from_the front.wav
      * move_away_from_the back_side.wav

      GINA: Has these available in their database for download/import, without the need to even edit in your name.  So if you're using GINA, you are set already not needing the above trigger imports.


      1346
       
      Al'Kabor Nightmare - At World's End
      [/size]
      Image Source: Allakhazam


      Zone & Instance Info
       
      Gather Zone: Al'Kabor's Nightmare

      NPC Name: Al`Kabor
      NPC Location: At Dreadlands isle

      Keyword to Enter: prepared


      Flag & Key Requirements
       
                          
      Zone Flags: Group zone access to Al'Kabors Nightmare
      Island Access Tasks (soloable)
      Event Key: Rusty Gate Key
      Event Flag:


      Brief Event Overview and Strat

      * Mandatory Audio/Text GTT Trigger information is available in the GTT section further down in this post.
      * Event contains AURAs which REQUIRE Particles TURNED ON before zoning.  Refer below for details.

      This event takes place in TWO main stages.  In between, we must move around different areas to reach our event areas.  Please watch /rs for instructions when this occurs and use INVIS as we move.  Thanks!

      STAGE 1: Protect & Kill - Assist MA as we kill FOUR Ice Giant adds, followed by Zephycrush the miniboss.

      STAGE 2: Pather AURAs, visiting your bind, and Al'Kabor the Long Winded
        For this stage, there are FOUR friendly NPCs around the area we must protect from ADDS & Pathing AURAS.

        There are FOUR pathing AURAs with HUGE DD/Effects that you MUST AVOID or you'll end up dead and visiting bind.

        Assigned Tanks/Pullers, snag the adds in your quad and bring to the raid for killing.  All others ASSIST MA please!

        Prior to and after Al'Kabor goes active, random players are DoT'd. 

        During Al'Kabor, please ASSIST your assigned MA when called on to kill the adds that spawn every 30 seconds.
      Any questions, please ask in the FLRaids:raids channel, and/or reply to this thread.  Thanks.


      Stage 1 - Zephycrush & Ice Giants

      We must protect Dagda Icefury from Zephycrush and his ice giant buddies.

      If Dagda Icefury dies, the event resets.

      • FOUR Ice Giants that hit for 18000.

       
      • Zephycrush hits for 20000.

       
      • Various associated AEs and details listed below.
       
                spacer     spacer     spacer     spacer     spacer     spacer     spacer               spacer     spacer     spacer     spacer     spacer     spacer     
      ZEPHYCRUSH       Permafrost Explosion - 20k DD + 15k DoT + Snare + Melee SLOW (PBAE)
      (mini-boss) Snow Flurry - 25k DD + 17k DoT + SILENCE (emote/targeted)
          GTT Pattern: appears to be watching you
         
          * Required Actions
          Run-away when emoted!  So you don't silence the raid.


      ICE GIANTS Coat of Hoarfrost - 900 DS (self-buff)
      (adds 4x) Icy Shards - 35k DD (single-target)
         
          * Required Actions
          TANKS: These MEM-BLUR occasionally
          RAID: Assist MA to dispatch.


      Stage 2 - Al'Kabor, Pathing AURAs, and our Friends

      For this stage, we have to protect FOUR NPCs located in different areas from adds and pathing AURAs with massive DDs.

      Please AVOID THE AURAs ALWAYS!

      Do not leash any mobs.  Thanks!


                     spacer     spacer     spacer     spacer     spacer     spacer     spacer     spacer     spacer               spacer     spacer               spacer     spacer     spacer     spacer     spacer     spacer     spacer                                             spacer     spacer     spacer     spacer     spacer     
      AL'KABOR       Hits for 22000
      (boss, perma-rooted)       Repulse - Knockback/up (PBAE 100' range, around pyramid)
      Arctic Chill of Al'Kabor - 40k DD + 10k DoT (single-target, RNG Player targets)
          Annihilating Flames of Al'Kabor - 10k DoT + 64k DD Recourse if not cured
          (Curse cures, 54 counters)
          GTT Pattern: You are engulfed in flames.
         
          * Required Actions
          AEs above are in effect even before Al'Kabor active
          Splash / Curse Cure self/others.
         
         
      SKELETONS Two spawn every 60 seconds (until Al'Kabor active)
      (an icebane skeleton) Glare of Ancient Ice - Spell REFLECT 75% (self-buff)
          Frozen Shadows - Stun (18 seconds)
         
      (a charbane sekeleton) Charmor - 1200 DS (self-buff)
      Charburst -30k DD (PBAE, 200' range)
         
          * Required Actions
          Spawn around area/near friendly NPCs
          We must pull and kill them!
          Casters & Rangers (bow dps) on Charbanes
          Melee on Icebanes
         
      Various Adds Spawn every 30 seconds once Al'Kabor active
      (a bloodbane skeleton) Some of their tricks/AEs include: Invulnerable, Stuns
      (Information Kills) Mana Drains, and Viral DoT + SpinStun
      (Power of Secrets)
      (Knowledge is Power)
      (Dedication is Knowledge)
      (^ this one viral DoTer)
          * Required Actions
          Assigned groups assist your MA
          Paladins, splash at add kill area please


      Pathing AURAs and Your Bind Pointl

      There are four different roaming AURAs.  The effects are no joke.

      To see them, you must have the correct Particle settings in options turned on (and it'll require zoning to take effect).

      Options (ALT+O)[list bull-blackarrow]
      • Display Tab

        [list bull-blackarrow]
      • Particles section
          [list bull-blackarrow]
      • Player tab sub-section

        Next to "On For", set to: Everyone[/list][/list][/list]
      * Note: We will try and remember to remind in the MOTD and/or /rs during prep/gather about this setting.  However, it's probably best to set this ahead of time, just in case!


      Text / Audio Triggers - Mandatory
      [/size]

      AURAs & Flame Recourse: ALL Mandatory Setup

      Pathing AURAs - Trigger will fire when any of the four types of AEs hit you.

      Flame DoT/Recourse - Annihilating Flames of Al'Kabor: 10k DoT + 64k DD Recourse if not cured
      Action: Curse cures remove (54 counters)


      All-in-One Puppy: ak-auras-rng-recourse-at-worlds-end.gtt

      Audio Files:
      runaway.wav
      get-cured.wav


      1347
       
      Miragul's Nightmare - The Force of Eternity
      [/size]


      Zone & Instance Info
       
      Gather Zone: Miragul's Nightmare

      NPC Name: Sig
      NPC Location: Top floor of the palace in the room adjoined to the balcony.

      Keyword to Enter: [ TBA - Depends on your GROUP ASSIGNMENT ]


      Flag & Key Requirements
       
                     
      Zone Flag: Group zone access to Miragul's Nightmare
      Event Key: Rusty Gate Key
      Event Flag:


      Brief Event Overview and Strat

      * Mandatory Audio/Text GTT Trigger information is available in the GTT section further down in this post.

      Know your group number please - As there are THREE separate areas to complete, each requiring special keywords to enter.

      STAGE 1: Magic, Body and Brain Rooms
        We're treating this stage as three mini-events.  Groups assigned to each section, join the proper channel for communication.

        Magic Room = Boss alternates between Melee/Spell weaknesses.  Adds spawn; kill using current weakness.  Assist MA and take advantage of the weaknesses.

        Body Room = Miniboss, spawns adds that explode for a huge DD/DoT if killed.  ENC MEZ adds; rest on boss.  Tanks mark adds.

        Brain Room = Trash only; spawns from chest.  Assist MA.  Do not loot anything.  Designated person loots/combines and does hand-ins.

      STAGE 2: Miragul Boss with split personalty (aka, includes a balance mechanic).
        At 80% Miragul splits into THREE mini-bosses akin to previous room versions of: Brain (aka Mind), Body, and Magic (aka Power).

        EACH of the three minis must be BALANCED to 50%, without exceeding 4% at any time, or the stage resets.

        Once ALL three are at 50% they despawn and Miragul respawns into a SINGLE BOSS again at 80% Health.

        From this point, when Miragul reaches 50% HP, Dread Construct golem adds roam around with an AURA that PULLS at you if caught in it (Drag of Dread)

        All the time Miragul is in SINGLE BOSS FORM, there is a ROOM DOOM DT that marks you.  30 seconds later, it fires.  Leaving the inner room cures it automatically.

        Tanks: Position your Boss/Miniboss in front of the entrances, so Casters have clear Line-of-Sight from outside the chamber.   But remember, do not leash them out of the room or it all resets.

      BALANCE PART OF THIS STAGE - Read carefully:

      Assigned groups, assist when instructed only.  Watch for /rs calls to keep balance in check.  Use your brain please, look at ETW, if yours is ahead, lay off a little until others catch up.

      Miragul Main Tank: Position Boss in front of an entrance so Casters/Rangers have clear Line-of-Sight from outside the chamber and avoid the DD.   Do not leash it outside the room, or it all resets.[/list]
      Any questions, please ask in the FLRaids:raids channel.  Thanks.


      STAGE 1 - Magic, Body, and Brain Rooms

      * Read Carefully:

      During prep, you'll be divided into THREE groups.  Each group goes into a channel, and from there you will get instructions how to zone in.  This will avoid people zoning into the WRONG AREA and is a known cause for Halfling high blood pressure due to stress from slacker clowns not reading instructions (<shakes fists>).  PS, pie lowers blood pressure.

      Sig NPC needs you to SET your location outside to port you where ever you are going.

      There is ONE Keyword for EACH ROOM as outlined:
       
                     
      BRAIN ROOM /say Brain
      BODY ROOM /say Body
      MAGIC ROOM /say Magic

      Once you have SET your room with SIG to zone in, you simply /say Ready.


      Magic Room: The Synarcana

      For this room, every 20 seconds The Synarcana alternates between various Spell/Melee type immune/vulnerability states.

      Several of the states involve spawning an indifferent Magical Mote add that MUST be killed within 60 seconds using whatever vulnerability state is in play at the time.  The add does not hit back, nor can we damage it by any other means except its' vulnerability.

      Refer to the GTT area for the related weakness overlays.

      • Synarcana hits for 21500.

       
      • Various associated AEs and details listed below.
       
                spacer     spacer     spacer     spacer     spacer          spacer     spacer     spacer     spacer     spacer     
      SYNARCANA       Power of the Synarcana - 20k PBAE (160' range)
      Touch of the Synarcana - 25k PBAE (40' range)
         
          * Required Actions
          Adapt Spell/Weapon type according to emotes
         
         
      Magical Mote Scintillating Explosion - 55k DD + Stun (PBAE, 110' range)
         
          * Required Actions
          Attack with weakness type only
          Mote despawns 60 seconds and AE fires as penalty
         

      Body Room: Miragul`s Lich

      This room involves a single mini-boss that spawns adds.

      • Miragul`s Lich hits for 21000; AE Rampages.

       
      • Corpse Bomb adds are mezzable, stunnable, but explode for huge DD/DoT if killed.

       
      • Miragul`s Lich will WAKE up mezzed mobs now and then just to cause trouble! <shakes fists>

       
      • Melee - Remove ALL forms of Damage-Shield Buffs to prevent killing the low HP Corpse Bombs
                spacer     spacer     spacer     spacer     spacer          spacer     spacer     spacer     spacer     spacer     spacer     
      Miragul`s Lich       Lethal Lifetap - 45k DD (lifetap)
      Paralyzing Wind - 12k DoT + Melee SLOW + Snare + Stun (Poison Cures 54 counters)
         
          * Required Actions
          Main Tank: Corner pin in room
         
         
      Corpse Bomb Corpse Bomb - 40k DD + 10k DoT + Snare (PBAE, 110' range)
         
          * Required Actions
          ENC: Mez and hold adds
          Melee - Remove ALL forms of Damage-Shield Buffs
          to prevent killing the low HP Corpse Bombs
         

      Brain Room: Adds

      For this room, non-confrontational adds spawn from a big chest and path towards a portal and eventually despawn.

      The adds drop items we need to combine and use against the Expunged Evil and Miragul`s Mind.

      Various AEs are in play, including penalty ones if we begin to lose pace with the adds.

      Please do not loot any corpses unless tasked to do so.  A limited number of drops and subsequent combines are available.

       
           spacer                    
      AEs       Evil Power - 50k DD (PBAE, 100' range)
         
          Penalty AEs if we begin to fail
      Stunning Insight - PBAE STUN (10 seconds, 100' range)
      Tremendous Regret - 40k MANA DRAIN (PBAE 100' range)


      STAGE 2 - Miragul Reformed


      Overview

      At 80% Miragul splits into THREE mini-bosses akin to previous room versions of: Brain (aka Mind), Body, and Magic (aka Power).

      EACH of the three minis must be BALANCED to 50%, without exceeding 4% at any time, or the stage resets.

      Once ALL three are at 50% they despawn and Miragul respawns into a SINGLE BOSS again at 80% Health.

      From this point, when Miragul reaches 50% HP, Dread Construct golem adds roam around with an AURA that PULLS at you if caught in it (Drag of Dread)

      All the time Miragul is in SINGLE BOSS FORM, there is a ROOM DOOM DT that marks you.  30 seconds later, it fires.  Leaving the inner room cures it automatically.

      Miragul Main Tank: Position Boss in front of an entrance so Casters/Rangers have clear Line-of-Sight from outside the chamber and avoid the DD.   Do not leash it outside the room, or it all resets.

      • Miragul hits for 22500; AE Rampages.

       
      • Various associated AEs and details listed below.
                                    spacer                              spacer     spacer     spacer     spacer                         spacer                         spacer                    spacer     spacer     spacer     spacer     spacer               spacer     spacer     spacer     spacer     
      MIRAGUL       Lethal Lifetap - 45k DD (lifetap)
      Power of the Synarcana - 20k DD (PBAE, 160' range)
      Miragul's Splart - Gradual DoT Increase (single-target)
      Miragul's Self-Immolation - 38k DD (PBAE, 120' range)
      Miragul's Hulking Bodyguard - Swarm pet(s), Proc Buff (Self)
      Spreading Evil - 35k DD + 10k DoT + MELEE SLOW (VIRAL - single-target w/emote warning)
         
        Dread Construct Drag of Dread - Pull Aura
      (golem add)
          * Required Actions
          Four to six spawn at 50% Miragul HP
      CC: Root/park golems away from raid.
         
         
        BALANCE STAGE MINIS:
         
      BRAIN (aka MIND) Power Rebounds - 650 Damage Shield (self-buff)
        (Miragul`s Shattered Mind) Power Surge - 24k PBAE DD (175' range)
        (South) Evil Aura - 20k DoT + SILENCE (PBAE 150' range, corruption 32 cntrs)
       
         
      BODY Lethal Lifetap - 45k DD (Lifetap)
        (Miragul`s Broken Body) Paralyzing Wind - 12k DoT + Melee SLOW + Snare + Stun (Poison Cures 54 counters)
        (North)
       
         
      MAGIC (aka POWER)       Power of the Synarcana - 20k PBAE (160' range)
      (Miragul`s Erratic Power) Touch of the Synarcana - 25k PBAE (40' range)
        (East)
         
          * Required Actions
          Adapt Spell/Weapon type according to emotes
          (same as earlier version of Synarcana)
         
      Magical Mote Scintillating Explosion - 55k DD + Stun (PBAE, 110' range)
       
          * Required Actions
          Attack with weakness type only
          Mote despawns 60 seconds and AE fires as penalty


      Text / Audio Triggers - Mandatory
      [/size]

      ALL Mandatory Setup

      All-in-One Puppy: mn-trigs.gtt

      Audio Files:
       
      runaway.wav
      Alert5.wav


      1348
      Upcoming Events & Strategy / UF - Convorteum - E6: Magus Sisters
      « on: March 08, 2012, 07:43:57 PM »
       
      Convorteum - Event 6: Magus Sisters
      [/size]


      Zone & Instance Info
       
      Zone: Convorteum

      NPC Name: Grif Iceblock
      NPC Location: At the zone-in of Convorteum

      Keyword to Enter: ready


      Flag & Key Requirements
       
                          
      Zone Flag: Convorteum (Group zone, /ach Appease the Gatekeeper & Unlock the Mystery)
      Event Key: None
      Group Mission: (refer above, Convorteum group zone access required)
      Event Flag: Raid Flag: Audience with Brell Serilis

      Note: Limited Piggy spots available based on number of flagged players in raid at the time.

      * Minimum PIG requirements to attend:

      - Must have access to the Convorteum zone through group progression.


      Brief Event Overview and Strat

      For this event, we must tank FOUR Magus Sisters simultaneously; while dealing with their AE's and special EMOTE/DT style mechanic.  There are no adds.

      Each Sister must be killed within within 1 minute of each other.

      The EMOTE/DT Mechanic works as follows:

      Every Sister casts 'Energy Wave', a 20k DD AE periodically.

      At timed intervals, EACH Sister targets and casts a unique debuff on SIX players nearby.

      The debuff effect make THAT particular sisters 'Energy Wave" AE do DT like DMG.  However, the 'Energy Wave' AE from ANY OTHER Sister will REMOVE your debuff, and you only take 20k DD damage.

      So, the idea is, when you are hit by the debuff, you MOVE to another Sister, your debuff is removed, and you move back and resume your role.

      TANKS will get emoted as well, and require SWAPs so they can move to the other sister and survive.  Tanks must setup proper SWAP hotkeys please.

      Know your group number please, as we're splitting the raid in two sections.  Each side will alternate between their two sisters to remove the debuff if targeted.

      We will take each Sister down to 5% and co-ordinate with a kill call so they die within the 1 minute time frame.

      ALL Trigger information is available in the GTT section further down in this post.

      Any questions, please ask reply to this thread, and/or ask in the FLRaids:raids channel.  Thanks.


      Magus Sisters - Overview

      • All hit for 18000

       
      • perma-rooted

       
      • Each have specific AE's, and Emotes (details in related sections below).

       
      • Must contend with all simultaneously.
      * Important:  The actions areas are only covering the AEs.  The Emote/Switching I'll explain in a seperate area for clarity.
       
         spacer             spacer     spacer               spacer     spacer     spacer     spacer     spacer     spacer     spacer     spacer          spacer               spacer     spacer     spacer     spacer     spacer     spacer               spacer     spacer     spacer     spacer     
      One Side of the Room:       
         
      Therias        Virulent Pustules - 5k + Viral on fade: Contagious Pustules (bard window, disease 35 cntrs)
        Energy Wave - 20k DD (200' range)
          Therias' Debilitating Energy - Increase Spell DMG: 112485 (any other sister Energy Wave AE will remove this buff)
         
      Feonyss Virulent Pustules - 5k + Viral on fade: Contagious Pustules (bard window, disease 35 cntrs)
        Energy Wave - 20k DD (200' range)
          Feonyss' Debilitating Energy - Increase Spell DMG: 112485 (any other sister Energy Wave AE will remove this buff)
         
          * Required Actions
          Same actions for both Therias/Feonyss:
          Cleric/Druids - Cure ward rotation if assigned this side.
          Paladins assigned this side, splashes will help remove DoT.
         
         
        Other Side of Room:
         
      Daphris Scorching Beam - 18k DD FRONTAL Arc
        Energy Wave - 20k DD (200' range)
          Daphris' Debilitating Energy - Increase Spell DMG: 112485 (any other sister Energy Wave AE will remove this buff)
         
          * Required Actions
          Everyone avoid FRONT of Daphris
         
         
      Selistras Selistras' Curse of Ineptitude - 300% Spell Slow + 80% Melee Slow (curse 16 cntrs)
        Energy Wave - 20k DD (200' range)
          Selistras' Debilitating Energy - Increase Spell DMG: 112485 (any other sister Energy Wave AE will remove this buff)
         
          * Required Actions
          Paladins - Splashes will remove the Curse


      Text / Audio Triggers - Mandatory
      [/size]

      ALL Classes - Mandatory

      Debilitating Energy debuffs.  React to trigger and switch sister when yours trigger fires.

      AEs:
      Therias' Debilitating Energy - Increase Spell DMG: 112485
      Feonyss' Debilitating Energy - Increase Spell DMG: 112485
      Daphris' Debilitating Energy - Increase Spell DMG: 112485
      Selistras' Debilitating Energy - Increase Spell DMG: 112485


      ALL-IN-ONE Trigger File: cv-e6-lashes.gtt

      Audio Files: Audio File: other-sister.wav


      1349
      Upcoming Events & Strategy / HoT - Upper - Guardian of the House
      « on: April 19, 2012, 03:47:03 AM »
       
      Upper - Guardian of the House
      [/size]

      Image Source: Allakhazam


      Zone & Instance Info
       
      Gather Zone: House of Thule, Upper Floors

      NPC Name: Lilth
      NPC Location: At western zone-in area

      Keyword to Enter: depart


      Flag & Key Requirements
       
                     
      Zone Flag: Group zone access to Upper
      Event Key: Rusty Gate Key
      Event Flag:


      Brief Event Overview and Strat

      For this event, Lilth warps to locations throughout the zone and casts several AEs.

      As we navigate to her rooms, we will encounter several minibosses and various hard hitting adds.

      Please note, one room we pass through in the icy area has portals on the floor only visible with spell effects on.  If you touch one, you merely get ported into the water below.  Just navigate back to us if it happens.  Thanks.

      Enchanters & Paladins: Zombies are mezzable/stunnable.  All other mobs are immune to normal CC methods.

      Lilth enjoys fearing and charming players.  Be ready if our MT gets charmed and if you happen to get summoned disc defensively until our next MT can get aggro.   Thanks!

      DoT'ers -  Lilth blurs after each warp.  However, your DoTs will remain and re-aggro causing her to summon you.  Please Fade or FD if this happens to you.

      Any questions, please ask reply to this thread, and/or ask in the FLRaids:raids channel.  Thanks.


      Reminder: Make sure to have Particles set on for easier navigation around the portals just before Lilth 1 on map.

      Options (ALT+O)[list bull-blackarrow]
      • Display Tab

        [list bull-blackarrow]
      • Particles section
          [list bull-blackarrow]
      • Player tab sub-section

        Next to "On For", set to: Everyone[/list][/list][/list]

      Boss: Lilth

      • Hits for 22000

       
      • Flurries, Single-target rampages

       
      • Staged event, and as a result Lilth warps around to various zone posts depending on the stage.

       
      • Various associated AEs and details listed below.

                          spacer     spacer     spacer     spacer     
      LILTH       Banshee Wail -  20k DoT + Decrease Accuracy 100% + Blind (75' range, 20 curse counters)
      Ectoplasmic Burst - Melee Slow 20% (single-target)
      Night Terrors - CHARM + 9k DoT (hits multiple players)
      Night Terrors - FEAR (PBAE, 200' range)
         
          * Required Actions
          Charm lasts 1 tick (6 seconds).  Aggro may bounce.


      Minibosses & Trash Adds

      • Various trash style adds include Guardians, Beasts, Snakes and Abominations.

       
      • Trash & Minibosses hit for between 18000 - 20000.

       
      • Groundshattering golem casts Earthshock - 40k DD + FD (PBAE, 200' range).
         
      • ZOMBIES are mezzable and stunnable.  The rest of the trash adds are immune to all forms of CC.

       
      • Minibosses and related AE details listed below.
       
           spacer          spacer          spacer          
      FEARSPINNER       Fear Venom - 25k DoT (single-target, 40 poison counters)
         
      SPINESLICER Cleave Armor - AC Debuff 540 (single-target)
         
      FOGWEAVER Invading Fog - Melee & Caster Silence (AE Frontal Arc, 10 corr cntrs, 50' range)
         
      BOSCO See No Evil - BLIND (PBAE, 100' range)


      1350
      Upcoming Events & Strategy / UF - Convorteum - E7: The First Creation
      « on: April 06, 2012, 10:04:20 PM »
       
      Convorteum - Event 7: The First Creation


      Zone & Instance Info
       
      Zone: Convorteum

      NPC Name: Grif Iceblock
      NPC Location: At the zone-in of Convorteum

      Keyword to Enter: ready


      Flag & Key Requirements
       
      Zone Flag: Convorteum (Group zone, /ach Appease the Gatekeeper & Unlock the Mystery)
      Event Key: None
      Group Mission: (refer above, Convorteum group zone access required)
      Event Flag: Raid Flag: Audience with Brell Serilis

      Note: Limited Piggy spots available based on number of flagged players in raid at the time.

      * Minimum PIG requirements to attend:

      - Must have access to the Convorteum zone through group progression.


      Brief Event Overview and Strat

      This is a timed event, that takes place in TWO stages. 

      Timed adds and a DEATH TOUCH mechanic are in play for the ENTIRE EVENT.

      DT targets random players every 30-60 seconds.  CURSE CURE is required within 30 seconds of being marked, or you will die.

      Select groups by assignment, please ASSIST your MA when called upon.

      STAGE 1:

      Bridge Protectors & Guardians = Assist MA, we kill the guardian FIRST, then the two protectors, repeating for each bridge.

      Inner Area - Protectors &  Shield Maidens = Assist MA, we will pull protectors and kill. 

      For Shield Maidens WATCH /RS CALLS please.  Each maiden has a self-buff we must deal with properly:

      Shield Maiden's Reflection = No spells will land so don't cast.  Melee DPS only.

      Shield Maiden's Spines = Huge DS.  Melee immune (mostly).  Casters get close to DPS (belly caster, or you'll resist)

      Maiden without a self-buff = DO NOT CAST ON IT.  Otherwise 25k DD hits our MT for every cast on her.

      STAGE 2

      When the last maiden dies, The First Creation activates, along with more timed adds.

      During this last stage, the DT and Skirmishers/Lava Golems will continue to spawn.

      Only asigned groups are to attack The First Creation.

      Do not ever leash Creation, or it'll RESET to 100%

      Assigned CC/Groups will deal with the adds.

      Reminder:  Do not loot any bane clickies unless you have been tasked to do so please.  Thanks.

      ALL Trigger information is available in the GTT section further down in this post.

      Any questions, please ask reply to this thread, and/or ask in the FLRaids:raids channel.  Thanks.


      Death Touch - Doom Mechanic

      Throughout the entire event, random players will be targeted every 30-60 seconds with Curse of the First Creation (DT Marker)

      Curse cure required within 30 seconds of being marked, or player gets death touched.

      Private Pattern: You are cursed by the touch of The First Creation

      Public Pattern: Soandso shivers in anticipation.


      Timed Adds - Skirmishers & Lava Golems

      Spawn throughout the event, regardless of stage.

      Skirmishers:
      • Six located around the permiter of the pit (they stealth themselves)
      • Respawn every 8 - 12 minutes in front of the white benches
      • Hit for 16000
      • MEM-BLUR themselves!
      • Warp around to on random players each time
      • AE details in table below
      Lava Golems:
      • Several spawn around the inner island lava pit/moat
      • Respawn every 6 minutes
      • Hit for: 8000.  They are straight up melee, cast no AEs.
      SKIRMISHERS       Skirmisher's Chromadrain - 7k DoT + Snare (single-target, detri)
      (a skirmisher) Skirmisher's Chromastrike - 39k DD (single-target)
        Skirmisher's Stealth - Their stealth cloak


          * Required Actions
          Priority assist MA call to kill ASAP (when active)
          Reminder: Any active mob not agro'd within 1 min will reset event
         
         
      LAVA GOLEMS * Required Actions
      (a lava elemental) CC: Charmable, immune to mez
          PAL/ENC: Stunnable
         
          RAID: Assist assigned MA G#/#
          ENC: charm, assist assigned MA


      Stage 1 - Bridge Guardians & Protectors

      We're in a big circlular room.  At various positions, mobs guard areas and bridges.

      All hit for 17000.

      BRIDGES: Guardians & Protectors
      • Each bridge has THREE mobs (1 guardian, 2 protectors)
      • Protectors respawn when killed, UNLESS we kill the guardian FIRST.
      • Protectors must be  killed within THREE MINUTES of their guardian's death.
      • Do not leash these mobs; or they will reset to 100%
      • None of these case AEs.
      INNER-CIRCLE AREA

      Protectors: Straight up melee, no AEs/specials; not tethered.  We will pull and dispatch, assist MA.

      Shield Maidens: Perma-rooted.  Special self-buffs (read details below please).
       
      Maiden Self-Buffs        * Required Actions
      Shield Maiden's Reflection No spell casts; melee only
        (100% Spell Reflection)
         
        Shield Maiden's Spines Immune to 'most' melee attacks
        (2500 Damage Shield) Casters get close (belly caster)
          Test/report degree of melee immunity please.
         
        No Self-buff Any maiden without a self-buff
          will redirect 25k DD onto her current
          target for EVERY SPELL CAST on her
          Watch /rs calls please.
         
      Note:  The First Creation goes live after the last maiden dies.  Stage 2 begins.

      BANE DETAIL:  Only those tasked will loot these cores.  Thanks.

      Each bridge guardian drops a Gravity Core. The effect on this item can be used to do 3.6 million damage to The First Creation. It can be used at any point in the fight with The First Creation, but be warned that it generates instant aggro on the caster.


      Stage 2 - First Creation & Friends(his, not ours)


      The First Creation:

      • Hits for 24000
      • Flurries, single-target rampages; AE rampages
      • If leashed, resets to 100%!
      • Various AEs & self DS
      AEs:

      Repulsion of the First Creation - 10k DD + Knockback/up (PBAE, 200' range, chroma 700 (50% chance to resist))
      Lava Elemental Protection - Incremental DS (starts at 100, goes to 1000 DS)

      Adds:

      Various adds spawn during this stage.
      • ALL are Mezzable and Stunnable.
      • Live mobs gnolls, kobolds and sporali are CHARMABLE.
      • Cursed humans/zombies cast Death's Embrace (12k DD, single-target, 100' range)
         
      • Banshee's cast Banshee Scream 6k DoT
         
      • Sporali adds may attempt to HEAL The Creation
      • Remember, timed Skirmisher and Lava Golem adds will continue to spawn that we must deal with.
      • Additionally, the DT mechanic is still in play.
      * Required Actions Assist MA G#/#, and/or assigned CC/Mez/charm, depending on our setup.

      List of the various adds:

      a cursed human
      a drifting specter
      a wailing banshee
      a hulking zombie

      a gnoll guardian
      a gnoll soothsayer
      a kobold defender
      a kobold spiritcaller

      a sporali needleroot
      a sporali replenisher
      a sporali stoutspore


      Text / Audio Triggers - Mandatory

      ALL Classes - Mandatory

      Death Touch - Emote / Mark

      Throughout the entire event, random players will be targeted every 30-60 seconds with Curse of the First Creation (DT Marker)

      Curse cure required within 30 seconds of being marked, or player gets death touched.

      ALL-IN-ONE Trigger File: uf-e7-dt.gtt

      Audio File: get-cured.wav

      Private Pattern: You are cursed by the touch of The First Creation
      Public Pattern: Soandso shivers in anticipation.

      Note: Public is included, but it is text overlay only.  The Private includes the sound.  MOST classes can CURSE cure, however, those who cannot will require cures.

      Those who cannot cure, need to make a proper key for group (each group will have a curer), and hit the hotkey asking for a cure.


      Pages: 1 ... 88 89 [90] 91 92