Author Topic: CoTF - Argin-Hiz - Burn Out  (Read 22031 times)

Furro

  • Global Moderator
  • Pies Anonymous
  • *****
  • Posts: 6085
  • Karma: +18/-12
  • freelance raider
    • View Profile
CoTF - Argin-Hiz - Burn Out
« on: July 17, 2014, 11:38:00 PM »
Argin-Hiz - Burn Out
*[07/25/2014] NOTICE: This post has been modified to reflect amendments posted within this thread *


Zone & Instance Info
 
Gather Zone: Argin-Hiz

NPC Name: Vasser Fayeil
NPC Location: Same NPC as mission and tasks inside Argin-Hiz.  Use CTRL-F for Find window or this map for location.

Keyword to Enter: Send


Attuning to Argin-Hiz

In order to use the portal to Argin-Hiz located in Ethernere Tainted West Karana, you must first attune yourself to it.

Go to South Ro to the area just east of the Wizard spires, where you'll see a giant burning tree. Clicking on this will zone you into Argin-Hiz. Just east of the zone-in inside Argin-Hiz is the portal to the Ethernere Tainted West Karana.  That's it, you're now attuned to use the portal in Ethernere to reach Argin-Hiz!


Flag & Key Requirements

Zone Flag: None
Event Key: None
Group Mission: None
Event Flags:  Ethernere - The Doomscale Horde
Ethernere -  The Defense of Lendiniara
Dead Hills - Xulous Prime
Dead Hills - The Legacy of Bayle
Bixie Warfront - Saving Jacyll
Bixie Warfront - Pelzia's Plot
Neriak Fourth Gate - The House of Thex
Neriak Fourth Gate - Hate Rising
 
* Minimum to be Piggy/85'/pushed into raid: Nothing required.


Brief Event Overview & Strategy

Multi-stage event.  Defeating mobs within each stage advances us until completion.


Stage 1 - SIX Keepers of the flames

Six Keeper of the flame mobs attack.


Stage 2 - Avatars of Ro (Imps) & Beam AEs

Once the Keepers are down, 18 avatars of ro (Imps) fly down from above.  Four remain at middle pit unkillable and emote before casting unresistable beam DT AEs at indicators around the room.

The BEAM AEs are no joke: Blazing Beam - 180k DD + 20k MANA and ENDURANCE Drain (15' wide).  Two of the four beams fire at the same time.

Imps are mezzable.  However, when an imp dies, it'll wake up TWO mezzed imps.  Imps have a 16k DS (Mischievous Flameshield, or to the effect of a DS).


Stage 3 - Efreeti Lord Aresh, Sword Adds & Auras

When all the imps are killed, Efreeti Lord Aresh spawns in the middle pit area.  It pops animated sword adds and two AEs are in play: Tears of Ro - 65k DD 3x targeted AE rain.  And a pull effect called Fire Whip - 80k DD + Pull.

Throughout this stage, flameguides roam above dropping AURAS around the room (click this LINK to see what these look like, and avoid the areas).  Lit areas last 30 seconds.

Once the Efreeti Lord dies, the final stage activates.  BALANCE two High Keeper minibosses.


Stage 4 - Balance High Keeper Minibosses

High Keeper Arieal and High Keeper Jahar must be balanced within 2% or the higher one POWERS UP.

Arieal spawns pairs of phoenixes (birds).  These grow in size the longer they remain up and then EXPLODE to form a NEW bird.  Phoenixes also CHARM.

Jahar casts Sol Burst - 85k PBAE DD (75' range) and Brain Burn - 37k MANA DRAIN + Stun (single-target, MT exempt).

When ONE Keeper gets to 30% HP the other gets a new ability and heals them:
  • High Keeper Arieal turns into a phoenix, exploding with fire when she does (and when she reverts back).
  • High Keeper Jahar casts Flame Shackles (Stun + 42k DD) on the MT and teleports the player away and drops them from his hate list.


Our Strategy

Stage 1: SIX Keepers of the flames activate.

Mezzable.  Assist MA as we work one at a time.

Keeper MTs - If your mob isn't being killed and is NOT mezzed, please ask for mez in FLRaids channel.  Dry tank until time to kill.

CC: Enchanters & Bards
  • Please work out WHO is mezzing which keeper in advance so they can be locked down quickly without overlaps and misses.
  • Enchanters - Reminder: Confounding Constriction debuff is a DoT.  Please don't use it on mezzed mobs.
  • Inform FLRaids channel who is prematurely breaking mez so it can be addressed.

Stage 2: Avatars of Ro (Imps) & Beam AEs

Once the last keeper dies from Stage 1 -- EVERYONE INVIS -- Move to campfire -- 20 Imps fly down from above.

Assigned Warrior ( Soandso ) - Fortitude + AE Aggro and pull the imps to the CC corner (North offset, will show you if you're not sure).  Once there, Rangers/Druids will root as described below.  Before your Fortitude drops, FADE and move away from the rooted mobs to avoid death.

CC: Rangers & Druids

Imp Tanks - Alternate assisting from MA to HA each imp from the CC pile for killing.  This allows for visible target ring to appear and is less confusing for rooters.

ALL MELEE - Damage Shield on imps will KILL YOU.  Bandolier to NO PRIMARY with OFFHAND WEAPON ONLY to avoid the DS.  DO NOT USE KICKS or BASH they return DS hits as well and you will die.


Stage 3: Efreeti Lord Aresh, Sword Adds & Auras

Raid position at our Campfire marker.

Sword adds spawn in pairs and are both Percent based and Timed.  They de-spawn in pairs shortly after.

Off-Tank Sword adds at raid until they de-spawn.  Enchanters and Paladins, some swords are Stunnable (but not all).

DO NOT DISC/BURN BOSS!  We want to avoid being overrun with Sword adds.

Tank boss at our campfire marker.


Stage 4: Arieal & Jahar Balance and Phoenix Adds

Our positioning is inner quad area with specifics for Main Tanks on respective minibosses and phoenix adds.

THREE Phoenix adds spawn at 9% intervals.  Kill all within 65 seconds or they AE, RESPAWN and WIPE US.

Phoenix Adds Tanks: They spawn from Ariel.  Pull them slightly away, but keep them centralized to allow melee DPS to optimize target transitions (less moving, compliments AE dps/discs).

Assigned groups only will be balance DPS for Arieal & Jahar.

Tank Arieal at WEST inner quad corner where Councilor Murant NPC is located.

Tank Jahar at SOUTH inner quad corner where Councilor Tarae NPC is located.

Notes:
- Jahar MTO: Be ready when current MT gets teleported at the later stages.  Keep an eye open for an emote warning for this action, might help for future trigger.
- Balance part: If they fall outside of 2% balance, then for every 1% difference in their health, the healthier Keeper gains damage output and the weaker one loses it (25% per 1% out of balance).
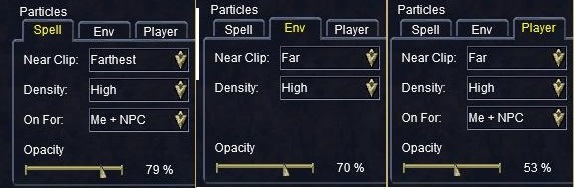


Beams & Auras

Make sure your options are set to a minimum level to SEE the auras in play.  Zoning is required for the changes to take effect.

To make the changes, in game go to Options (ALT-O), Display tab.  On that page there's a Particles area with three little tabs: Spells, Env and Player.  The cutout diagram below indicates the minimum levels required to see the auras.


Auras and 3rd Person View

3rd person view is great for getting a birds-eye view of the area real quick as you pivot around to find where the auras are and move if necessary.  Some of you can set up your mouse to scroll or press a button to reach 3rd person fast when the warning fires.  Then revert back with a button and resume your class role.  What's important here is that you're doing what's necessary to SEE the auras which enables you to REACT to them properly.


Text & Audio Triggers - Mandatory

Beam and Aura Warning Triggers - Everyone:

Everyone needs these set up.  If you're dying repeatedly to these auras, you'll be removed from the raid and replaced.

Fortunately, we can use the SAME pattern for both the Beams in play for Stage 2, and the 4x roaming auras of death as part of Stage 3.

ALL Players:

GTT File: cotf-argin-hiz-auras.gtt

Pattern: cackle with glee
Action: Check for Auras!

Pattern: a flameguide begins to cast a spell. <Blazing Beam>
Note: The actual beam AE firing.

Reminder: Always, adjust/tailor the trigger to your liking for what works for YOU.


Stage 3 - Caught in Aura Trigger

When in the Aura you'll die in two hits.  This will warn you each time you take damage from being in the aura.  Move out of the aura when the trigger fires.

GTT File: cotf-argin-hiz-auras-stage-3.gtt * Added 07/24/2014

Pattern: The rolling blaze painfully burns your skin


Trigger Addition: Stage 3 - Imps Spawning & Invisibility Reminder

Everyone being invisible as we start this stage will help our point tank who gathers up the imps.  It'll also save you from getting early imp aggro and being killed.

When the trigger fires, cast invisibility and move to our campfire.

GTT File: cotf-argin-hiz-stage-3-invis-now.gtt * Added 07/25/2014

Pattern: I call to you, Solusek Ro! Send us your assistance! Help us repel these invaders
Action: Cast Invisibility now and move to campfire.


Stage 4 - Triggers

Covers Minibosses imbalanced, Phoenix spawns, Phoenixes exploding.

GTT File: cotf-argin-hiz-stage-4.gtt * Added 07/19/2014


Minibosses imbalanced: the flames of the other grow much stronger
Phoenix spawn aggro message: a wildfire phoenix swoops down, talons outstretched and ready to strike
Phoenix exploding 105k PBAE: a wildfire phoenix has absorbed too much power

« Last Edit: May 31, 2021, 02:01:19 PM by Furro »

Mildaria

  • Slacker
  • *
  • Posts: 33
  • Karma: +3/-0
  • freelance raider
    • View Profile
Re: CoTF - Argin-Hiz - Burn Out
« Reply #1 on: July 18, 2014, 12:06:02 AM »
nm :)
« Last Edit: July 18, 2014, 12:08:38 AM by Mildaria »

Gimamam

  • Pie Hoarder
  • ***
  • Posts: 107
  • Karma: +6/-0
    • View Profile
    • Email
Re: CoTF - Argin-Hiz - Burn Out
« Reply #2 on: July 18, 2014, 05:00:29 AM »
Have a couple of screenshots. settings that let me see the fires, and the fires themselves for stage 2 and 3.

With these settings the stage 2 fires where the beams will go look like this.  They a lot of the time appeared mostly opposite of each other, but i did see some that were just around the same doorway at least once.

Gimamam

  • Pie Hoarder
  • ***
  • Posts: 107
  • Karma: +6/-0
    • View Profile
    • Email
Re: CoTF - Argin-Hiz - Burn Out
« Reply #3 on: July 18, 2014, 05:04:27 AM »
Also, in stage three, this is what they look like for me. depending on the settings you may look different. also, i pointed out the two glowing orbs/balls/floaters within the aura - they seem to be the 'front' of the aura and the direction it is heading.  i watched these go up and down the stairs, and around the corners and then flip directions and go the same route they just came from.  also, the screenshot was taken from the outer ring on a wipe where i was feigned against the wall, it passed me without hitting me. pathing as the orbs show - to the right.

Gimamam

  • Pie Hoarder
  • ***
  • Posts: 107
  • Karma: +6/-0
    • View Profile
    • Email
Re: CoTF - Argin-Hiz - Burn Out
« Reply #4 on: July 18, 2014, 05:05:14 AM »
sorry for the spam :(.  found a better shot of the orbs.

Furro

  • Global Moderator
  • Pies Anonymous
  • *****
  • Posts: 6085
  • Karma: +18/-12
  • freelance raider
    • View Profile
Re: CoTF - Argin-Hiz - Burn Out
« Reply #5 on: July 18, 2014, 08:25:00 PM »
sorry for the spam :(.  found a better shot of the orbs.

I think that's just the heart of the aura effect, ie. part of the graphics of the aura.  If you turn off certain options (how I had mine set earlier in the night), all you will see are the two little circling ball things and not the rest of the graphics.  In other words, I don't think they're indicative of anything related to which way the auras path will be.

I'll include your particle settings screen clips in the strategy post.  It's similar to what I have as well.  Thanks.


« Last Edit: July 18, 2014, 08:26:52 PM by Furro »

Furro

  • Global Moderator
  • Pies Anonymous
  • *****
  • Posts: 6085
  • Karma: +18/-12
  • freelance raider
    • View Profile
Re: CoTF - Argin-Hiz - Burn Out
« Reply #6 on: July 18, 2014, 09:45:24 PM »
 
We took our first look at this event on Thursday, with promising results.  Some additions and changes going forward outlined below.


Beams & Auras

Make sure your options are set to a minimum level to SEE the auras in play.  Zoning is required for the changes to take effect.

To make the changes, in game go to Options (ALT-O), Display tab.  On that page there's a Particles area with three little tabs: Spells, Env and Player.  The cutout diagram below indicates the minimum levels required to see the auras.


Auras and 3rd Person View

3rd person view is great for getting a birds-eye view of the area real quick as you pivot around to find where the auras are and move if necessary.  Some of you can set up your mouse to scroll or press a button to reach 3rd person fast when the warning fires.  Then revert back with a button and resume your class role.  What's important here is that you're doing what's necessary to SEE the auras which enables you to REACT to them properly.


Beam and Aura Warning Triggers - Mandatory

Everyone needs these set up.  If you're dying repeatedly to these auras, you'll be removed from the raid and replaced.

Fortunately, we can use the SAME pattern for both the Beams in play for Stage 2, and the 4x Auras of death as part of Stage 3.

ALL Players:

GTT File: cotf-argin-hiz-auras.gtt


Pattern: cackle with glee
Action: Check for Auras!

Pattern: a flameguide begins to cast a spell. <Blazing Beam>
Note: The actual beam AE firing.

Reminder: Always, adjust/tailor the trigger to your liking for what works for YOU.


Maglor

  • Jr. Pie Eater
  • **
  • Posts: 54
  • Karma: +2/-0
  • freelance raider
    • View Profile
    • Email
Re: CoTF - Argin-Hiz - Stage 3
« Reply #7 on: July 19, 2014, 01:43:48 AM »
You are missing a critical aura trigger.  "The rolling blaze painfully burns your skin."  This is the large aura that spawns during the 3rd stage.  If you get this -- RUN!

Maglor

  • Jr. Pie Eater
  • **
  • Posts: 54
  • Karma: +2/-0
  • freelance raider
    • View Profile
    • Email
Re: CoTF - Argin-Hiz - Burn Out
« Reply #8 on: July 19, 2014, 03:00:07 AM »
For third stage there seem to be 4 auras at any one time.  2 seem to target individuals and 2 seem to just sweep the outer rings.  Do not know if the latter part is correct but never saw less than 2 auras just sweeping the outer ring.

The audio message I posted earlier lets you know if you are in one of these auras.

Maglor

  • Jr. Pie Eater
  • **
  • Posts: 54
  • Karma: +2/-0
  • freelance raider
    • View Profile
    • Email
Re: CoTF - Argin-Hiz - Burn Out
« Reply #9 on: July 19, 2014, 03:23:41 AM »
I have attached the following.  Should work well enough.

Mildaria

  • Slacker
  • *
  • Posts: 33
  • Karma: +3/-0
  • freelance raider
    • View Profile
Re: CoTF - Argin-Hiz - Burn Out
« Reply #10 on: July 19, 2014, 07:23:20 PM »
If we can stay invis and be patient, the imps path into 4 piles (NE, SE, SW, NW) around the center flame:


They periodically path around to different corners, so the numbers in each pile aren't always equal. This is in the group mission, but is likely similar to the raid.

It may be easier to start CC'ing them from this setup.

Imp phase begins:
     Councilor Murant shouts 'I call to you, Solusek Ro! Send us your assistance! Help us repel these invaders!'

40 seconds later, the first beam emote goes off. It may take longer than this for all the imps to spawn and path to the middle.

After being unengaged for 2 minutes, the event resets.

Edit:

Balance failure emote (High Keepers):
     As one High Keeper grows weaker, the flames of the other grow much stronger. This imbalance is embraced by Solusek Ro, and is surely dangerous.

phoenix AE timer:
Aggro message:
     a wildfire phoenix swoops down, talons outstretched and ready to strike.

65s later, the phoenix explodes:
     a wildfire phoenix has absorbed too much power. It pulses with fire and then explodes, only to be instantly reborn.
« Last Edit: July 19, 2014, 08:33:02 PM by Mildaria »

Furro

  • Global Moderator
  • Pies Anonymous
  • *****
  • Posts: 6085
  • Karma: +18/-12
  • freelance raider
    • View Profile
Re: CoTF - Argin-Hiz - Burn Out
« Reply #11 on: July 19, 2014, 10:19:04 PM »
 
We made further progress on this event Friday reaching the final stage.  The following are our adjusts going forward.

Stage 1 - Keepers of the flames

Enchanters & Bards:
  • Work out who is mezzing which ones prior to engage so they are locked down immediately.
  • Let the channel know who breaks mez early, so we can address it.
Keeper MT - Kill the final one North inner quad area, so we're already centralized when we enter Stage 2.


Stage 2 - Avatars of Ro (Imps) & Beam AEs

When the final keeper dies from 1st stage, everyone INVIS and move North inner quad corner.

Assigned SKs with a bard for selos, will aggro and kite the imps around the room.  Assigned snarers snare them.

Assigned Monks - Use your Moving Mountain AA to snag an imp from the kite and bring it to CC corner for Enchanters to MEZ.

Rinse/repeat this until the ALL imps are CC'd in the Enchanter Mez corner. 

Assigned players only - root imps once they are in the mez corner.  Assigned SKs PBAE aggro mezzed imps in corner to prevent Enchanter deaths if mez/root breaks.

MA assist the designated imp tank, which will peel an imp from the CC area to raid for killing.  Rinse/repeat.

Imp Tank - Tank around North inner quad so that DPS always knows where to go and look to respond to MA calls each time as they avoid beams.

Melee DPS:  Imps have a MASSIVE DS.  Avoid it by using OFFHAND WEAPON only and non-damage main hand.  This way you can optimize your DPS and not just throw stones/bow from afar.

CC - Enchanters:
  • Your healer or other designate can act/help as a Beam Lookout, and warn if you're in the path so you can move and maintain your CC role.
  • Use the East corner for your CC operation, that way you're still close to North for imp peeling.


Stage 3 - Efreeti Lord Aresh & Fireballs

Full BURN on Efreeti Lord for this stage.  Avoid the roaming auras each time they spawn.

Enchanters & Paladins - Stun swords to help hold them at bay.


Stage 4 - Balance High Keeper Minibosses

No beams or auras appear to be in play for this stage.  Our primary focus is balancing two minibosses and killing adds fast before they explode.

Miniboss Tanks:
  • Tank Arieal at WEST inner quad corner where Concilor Murant NPC is.
  • Tank Jahar at SOUTH inner quad corner where Councilor Tarae NPC is.

Phoenix (bird) add tanks:
  • At HP intervals, THREE phoenixes spawn.
  • Position each a distance apart utilizing the inner area of the North and North - East side.  This way if one does explode, it's not next to another phoenix tank.

DPS:
  • Assigned groups to each miniboss.  Do not be on the minis unless part of these groups please.
  • Remaining groups assist MA for phoenix adds.
  • Phoenix adds must die as fast as possible.  This is your primary goal when MA calls upon you.
 

Stage 4 - Trigger Additions

Covers Minibosses imbalanced, Phoenix spawns, Phoenixes exploding.

GTT File: cotf-argin-hiz-stage-4.gtt


Minibosses imbalanced: the flames of the other grow much stronger
Phoenix spawn aggro message: a wildfire phoenix swoops down, talons outstretched and ready to strike
Phoenix exploding 105k PBAE: a wildfire phoenix has absorbed too much power


« Last Edit: July 20, 2014, 05:34:38 AM by Furro »

Furro

  • Global Moderator
  • Pies Anonymous
  • *****
  • Posts: 6085
  • Karma: +18/-12
  • freelance raider
    • View Profile
Re: CoTF - Argin-Hiz - Burn Out
« Reply #12 on: July 20, 2014, 05:31:55 AM »
 

Stage 2 - Avatars of Ro (Imps) & Beam AEs

When the final keeper dies from 1st stage, everyone INVIS and move North inner quad corner.

Assigned SKs with a bard for selos, will aggro and kite the imps around the room.  Assigned snarers snare them.

Assigned Monks - Use your Moving Mountain AA to snag an imp from the kite and bring it to CC corner for Enchanters to MEZ.

Rinse/repeat this until the ALL imps are CC'd in the Enchanter Mez corner. 

Assigned players only - root imps once they are in the mez corner.  Assigned SKs PBAE aggro mezzed imps in corner to prevent Enchanter deaths if mez/root breaks.

MA assist the designated imp tank, which will peel an imp from the CC area to raid for killing.  Rinse/repeat.

Imp Tank - Tank around North inner quad so that DPS always knows where to go and look to respond to MA calls each time as they avoid beams.

Melee DPS:  Imps have a MASSIVE DS.  Avoid it by using OFFHAND WEAPON only and non-damage main hand.  This way you can optimize your DPS and not just throw stones/bow from afar.

CC - Enchanters:
  • Your healer or other designate can act/help as a Beam Lookout, and warn if you're in the path so you can move and maintain your CC role.
  • Use the East corner for your CC operation, that way you're still close to North for imp peeling.


Ok scratch our previous mez tactic above.  We played with this more this evening and apparently it's too difficult for some to invis at the proper time. ;)

Our tactic is now as follows:

Stage 2 - Avatars of Ro (Imps) & Beam AEs

Kiting all the imps.  Players will be assigned a specific imp via hotkey /tar A_tiny_avatar_of_Ro##, where ## is your imp number.

You acquire your imp, snare it, and DPS it down as you kite it around.  DO NOT ROOT IT EVER.  We have people running around, we don't want them running into rooted imps.

We're not mezzing, we're not rooting.


« Last Edit: July 23, 2014, 08:43:40 PM by Furro »

Luthernhamner

  • Slacker
  • *
  • Posts: 13
  • Karma: +0/-0
  • freelance raider
    • View Profile
    • Email
Re: CoTF - Argin-Hiz - Burn Out
« Reply #13 on: July 22, 2014, 03:48:17 AM »
A couple of random observations.
The trouble we had with mezzing was every time we mezzed one, three more would kill the chanter.
Also, I tried to count the imps.  There are supposed to be 18 including the 4 in the middle, leaving 14.
I wasn't able to get an accurate count, but i'm pretty sure there were more than 14.  18 maybe?
A couple of times I needed to park Luther and go mez something with Eyegora
Tight up against the outside wall next to ramps that go vertical, but on the ground floor seemed pretty safe from the beams.

In this game there are many forms of crowd control.  Mezzing is the most obvious but not the only one.
Other forms of CC include rooting, off tanking and kiting.  I agree we should definitely give kiting a shot.
I'm a little concerned that the kiter might run into a beam of death. 

If the kiting thing doesn't work out, here's another thought.
If a single kiter could round up the whole group, and establish agro.  (I know big IF there)
Kite them around the outer circle, or maybe the inner.
Then a chanter could ae mez 6, they stop, and hopefully the rest follow the kiter. 
Chanter 2 then grabs 6 more, and chanter 3 the last 6.  Each chanter could take a different corner.
Maybe assign a couple of people to round up stragglers.
Have a sk ae taunt the stack so if mez breaks they don't eat the chanter for lunch.

If we had three stacks of six we could keep them mezzed all night. 
Even if one chanter got beamed, another could hold two groups for awhile
« Last Edit: July 22, 2014, 03:52:11 AM by Luthernhamner »

Mugsie

  • Slacker
  • *
  • Posts: 3
  • Karma: +0/-0
    • View Profile
Re: CoTF - Argin-Hiz - Burn Out
« Reply #14 on: July 22, 2014, 08:45:30 PM »
Phase 2 Idea
Gather raid out of LOS of imps.
Send in someone DA to round them up, they then run out a designated gateway to a mark (campfire?) and against the wall, making sure all the imps pile onto the mark. Bards can deftdance for extra time / sk deflection.
Druids / Rangers vinelash the mass. Cycle through and ensnare, paralytic spray as needed or other punt roots.
Drop tash / malo totems, ae debuffs ect.
Since imps dont summon you can either work down one at a time or allow aes to be used, but be careful about breaking multiple roots at once.

Mugsie