Author Topic: TBM - Demiplane of Decay - T1 Raid - Wither and Decay  (Read 17244 times)

Zaknaffein

  • Jr. Pie Eater
  • **
  • Posts: 52
  • Karma: +0/-0
    • View Profile
Re: TBM - Demiplane of Decay - T1 Raid - Wither and Decay
« Reply #15 on: May 13, 2016, 11:09:46 PM »
I changed the trigger for the vomits to show when next vomit is coming, and to give a 3 second warning to back away from Decay.

We have to be careful, when we're doing the one /ach where we need x people to stay near each boss, we wouldn't want them backing away.  Unless of course they were actually ooze targeted (which is a different emote).  Anyway, just mentioning it here, as others may be reading it as well, so a reminder to all!

We won't want to do the vomit and the keep 8 near each boss at all times at the same time, as it would be almost impossible to do the vomit /ach with people near Decay at all times.

The vomit one just requires the trigger roco has, where you time out each time a vomit is about to spawn and back away from decay a tic before the vomit spawns, and the person who is emoted runs to a designated location, or we use geometry to our advantage and force the blobs to grow big away from the person it's chasing.

Gimamam

  • Pie Hoarder
  • ***
  • Posts: 107
  • Karma: +6/-0
    • View Profile
    • Email
Re: TBM - Demiplane of Decay - T1 Raid - Wither and Decay
« Reply #16 on: May 26, 2016, 08:22:30 PM »
Good Morning FL'ers.

positioning is going to change the next time we do this raid.

1. Both Wither and Decay will be stacked at the ramp coming down from upstairs (previously where decay was alone.)
2. casters/range/healers that will NOT be under the pile will be on the west wall rocks. please be shrunk as far as you can be - we need to fit alot of people up there.
3. oozes last attempt seemed to go after the ranged people (casters) and none landed on the melee pile.  we are putting the casters so far away from the mobs so that the oozes will never reach them - for this, you can stay on the rocks and nuke to hell and back and the ooze should never touch you - ignore the run away emote (at least for now).
4. due to the stacking - melee will not have to move far to switch mobs - but you will likely end up with withering limbs 10. suck it up.
5. we need 8 on each aggro list and under the mobs at all times - meaning we will start the event with that minimum + more with auto attack on. tanks that are first up on the mto - you better be on top of your aggro on event start and stop them from killing a dps member. move the mobs slowly to the pile position so that we do not out range our 8 under them.

last week we had severe issues with push. stop it. the tank that is currently tanking is in charge of the positioning. keep the mobs on top of each other. 
please learn your abilities, if it has a push component. stop casting/using it for this fight. - if you are unsure, please post the name of the spell and we can look it up before the attempt. if it has a push component, and you are found to continue using it and you are not the current tank - removal from raid for wasting our time is a likely outcome.
if a mob is out of position, yell for the tank to put it back with the tank channel or flraids channel. do not attempt to re-position it yourself, overcorrection will just screw it up further.

last week doing this - even with the fucked up pushes - we were 1m17s off the enrage timer.  - without the push, we can do better. if we can gain another 2 minutes we can attempt the kill the wrong one a couple times.

lets do this.

Brenlaven

  • Slacker
  • *
  • Posts: 49
  • Karma: +0/-0
    • View Profile
Re: TBM - Demiplane of Decay - T1 Raid - Wither and Decay
« Reply #17 on: June 08, 2016, 02:04:43 AM »
Gima, the new positioning for Wither/Decay seems to be working very well.  The vomits are not popping on the melee range folks which is great!

As this strat is continued the only minor suggestion I can see is with were the fire is placed.  If the fire is placed closer the the ramp coming down into the pit then there are places where the casters can stand on the ground and have LOS and the vomits will never reach them in addition to standing on the rocks.

If W/D are at the fire being used now or slide over to the ramp...the vomits should still be getting no further than the bridge or just past the bridge in the middle as they move to the casters.

Since there is no need to move the bosses to avoid vomits anymore having the fire moved a little might make LOS easier for casters.

But either way, the stacked tanking seems to be working very well! Nice job!  Hope to see that All Retch and No Vomit ach fall soon!

Brenlaven

Gimamam

  • Pie Hoarder
  • ***
  • Posts: 107
  • Karma: +6/-0
    • View Profile
    • Email
Re: TBM - Demiplane of Decay - T1 Raid - Wither and Decay
« Reply #18 on: August 10, 2016, 04:33:23 AM »
Continuing the updated strat and achievement goal posts - here we are at Wither and Decay.

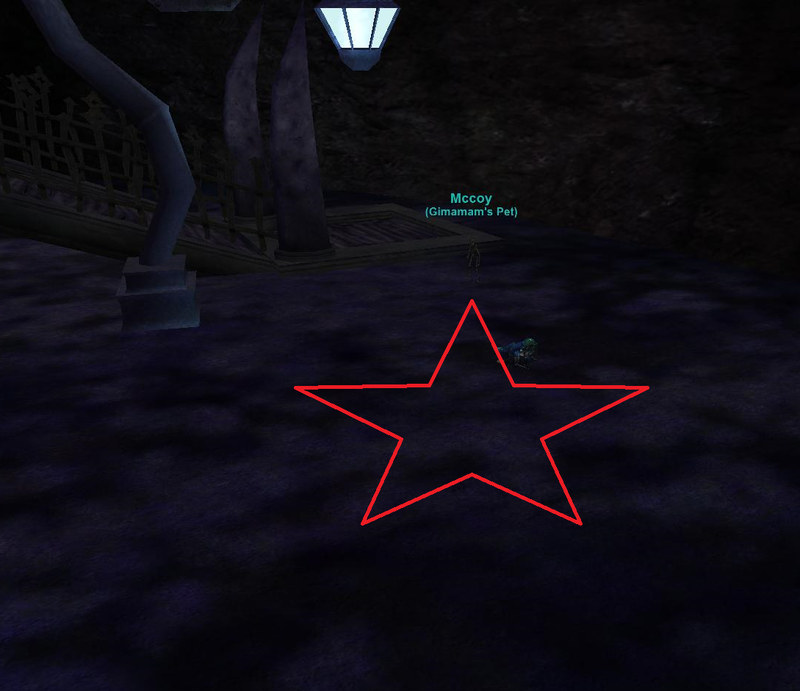
The strat has changed since initial inception. Where we used to tank them separated and run away with the oozes, this is no longer.  Now Wither and Decay are tanked on top of each other in one static location.

The reason for this change is two fold - it lets us have 8 under them at all times for The Crazy Eight Achievement, and it limits the movement of melee migrating from one mob to the other when the MA target changes.

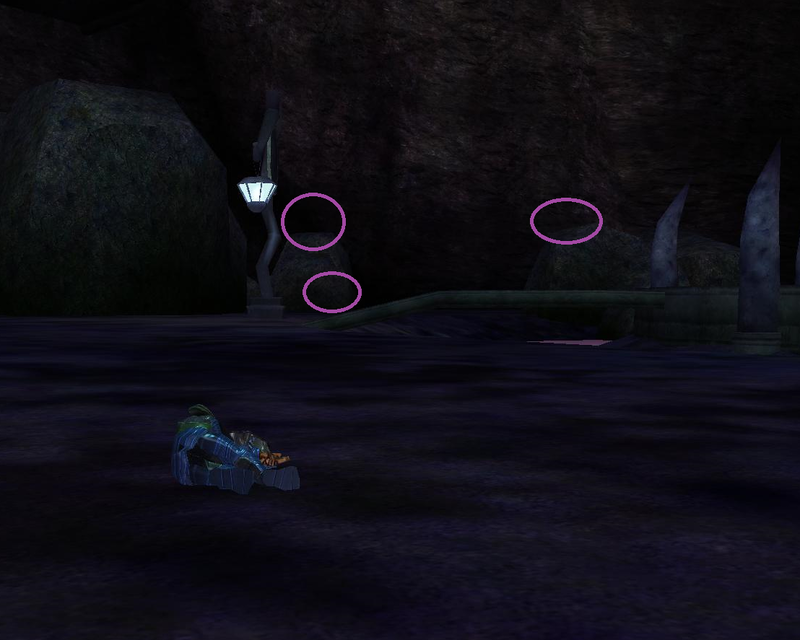
While the mobs are stacked in one location with the melee, the ranged/casters are subsequently stacked on the rocks across the room. A side effect of this split of the melee pile and the range pile is that the oozes go after the ranged folks 100% of the time.  The travel time of the oozes and the hangup of the bridge in the middle of the room causes them to expand well away from people.  This prevents damage from the oozes, and pretty much guarantees us the All Retch and No Vomit Achievement.

Due to the above, once you have started the fight in one pile or the other - you stay there. Don't move from the melee pile to the range pile and DEFINITELY DO NOT move from the ranged pile to the melee pile.  If you start in the range pile and move to melee, you are likely to cause an ooze to target you and drop it on the melee.  Also, due to the oozes going after the ranged pile, you are safe to delete your 'run away' trigger for an ooze targeting you.  If you are in the melee pile, get under the mobs - not a few feet away, not halfway across the room, not on the ramp. Be under the mobs, or be with the ranged. This fight is under 15 minutes, you can manage to stay put for that long.

Achievements: Third Time's the Charm, All Retch and No Vomit, The Crazy Eight
Third Time's the Charm - kill the wrong mob (red one) twice in a row before finishing event. When we do this, the first two mobs to die will be the wrong ones. Follow MA.
All Retch and No Vomit - Don't let the ooze damage you. See below.
The Crazy Eight - Have 8 people on aggro for each mob and under them at all times. see below.

For the All Retch and No Vomit - Do NOT cross the center of the room for any reason. The oozes are going to be in the middle, and you will fail us this achievement. This one is a gimme - literally stay put in your pile and we get this one.

For The Crazy Eight - all melee that will be under the mobs during the fight should get on the platform with auto attack on while targeting one of the two mobs. This will get you on the aggro list immediately on engage.  The first check for this is within a couple seconds from engage.  Follow the mobs to the fight location staying within melee range at all times. Tanks - Do not move the mobs too quickly, we need to keep people under them. Range, please wait until mobs are at the fight location/MA call before going balls out.


Pictures of locations:
MAP:


View of Melee area:


View of Range area:


Any questions - post here, PM me, or ask before we engage.
« Last Edit: August 11, 2016, 02:01:34 AM by Gimamam »