Show Posts

This section allows you to view all posts made by this member. Note that you can only see posts made in areas you currently have access to.


Messages - Furro

Pages: 1 ... 157 158 [159] 160 161 ... 168
2371
Upcoming Events & Strategy / Re: HoT - SS5 - Elements of a Dream
« on: August 12, 2012, 03:58:12 AM »
 
Updated /con trigs for Essences on this event.  Removed the regards portions based on Poddo feedback (he was doing clicks).  For those who never intend to do Essence clicks, you don't have to redownload them to update.

Be careful for those that are updating, I left the Avatar final Cast Trigger in with the combo set, and if you import the updated ones you'll have a double trigger there.  So just manually fix it etc.


Additional Notes & Adjusts:

  • Puzzle solvers will be more carefully selected as not to waste high DPS classes.

 
  • Arena Stage 2 - Half the Avengers were snareable.  Others were immune.


2372
Upcoming Events & Strategy / HoT - SS5 - Elements of a Dream
« on: August 11, 2012, 11:43:27 PM »
 
Sanctum Somnium - #5 - Elements of a Dream
*[08/17/2012] NOTICE: This post has been modified to reflect amendments posted within this thread *
 

Zone & Instance Info
 
Gather Zone: Sanctum Somnium

NPC Name: Towerguard Raena
NPC Location: She's located on the balcony across from the zone-in.

Keyword to Enter: fight


Flag & Key Requirements
 
Zone Flag: Group zone access to Morell's Castle
Event Key: Sanctum Key
Event Flags: Completion of the FIVE Tier 3 raids:
Guardian of the House
At World's End
Force of Eternity
  Cazic's Final Stand
  The Awakening
 
* Minimum Piggy/85'/push into raid: None


Brief Event Overview and Strat

For this event, we must deal with constant timed adds while completing puzzles to advance our progress.

Each Arena stage has roaming orbs that don't hit back but will explode various AE's when run over or touched.  Avoid them!

Select players will be tasked with looting ground spawn items that aid our efforts on certain adds for different stages.  Please don't loot anything unless told to do so please.

Assigned puzzle solvers join FLPuzzle:puzzle channel.

PUPPET DPS:
    DPS within select group numbers will be assigned a direction: South, West, North

    You are to go to the DOOR according to your assignment.  Once the event BEGINS, the door will be unlocked and you enter the hallway area.  Puppets spawn here, and path towards your puzzle solver who is located inside a room further in.

    RANGE DPS ONLY to kill the puppets as FAST AS POSSIBLE. 

    Druids, if you end up in a Puppet DPS group, you are to DPS (nuke, not joking), to help kill as well.  You are also backup Caller in case a puppet kills your puzzler.

    Enchanters, you can lurch puppets to prevent them from pathing.  Rangers, don't use punt; as it only causes the puppet to warp.
MAIN RAID AREA:

Stage 1 = Assist MA to Kill Dream Avatars.

Stage 2 = Assist MA to kill LOW HP 3% ones FIRST.  Kiting 100% ones until they drop to 3% by proper essence click.

Stage 3 = Assist MA to kill Dream Champions.  Essence clickers will prep these with different essences to reduce select resists. 

Final Boss Stage: The Dream Master's Avatar - BURN him down.  Tanks use discs and OT any adds that spawn.

Dream Master color changes indicate spell weaknesses: Normal color, use FIRE.  Green use Corruption.  Blue use Poison.  Red use ICE.

Any questions, please ask in the FLRaids:raids channel.  Thanks.


Sleeping Puppets

Select DPS will be assigned to kill these for all stages they are in play.
  • Puppets don't hit back, but instead path towards players in the colored pad puzzle rooms, and DT them.
  • Spawn 1-2 at a time in the hallways depending on stage.

The Arena

Each stage is associated with a Puzzle. 

As long as the puzzle is unsolved, we must deal with four adds of various types; spawning every minute.

They all hit for 11000 - 13000 range.

There's tricks to different mobs and how we'll deal with them as well for EACH stage.  Pay close attention please!


STAGE 1

Dream Avatars:

  • Scavenger's Saliva - 20k DoT (single-target, corruption cures)
  • COLORED ORBS spawn and float around the arena.  They don't hit back, but going near one causes it to explode.
  • Basic Orb: 20k PBAE DD (Energy Discharge)
  • Gravity Orb: Slow Push (Gravity Essence)

STAGE 2

Dream Avengers:
  • Flame Fist - 25k DD + Knockback/up (single-target)
     
  • They also mem-blur (but read below for counteraction details)
  • Mix of Avengers spawn at 3% HP, others at 100%.  We want to kill the LOW HP ones (3%).
  • When a low HP Avenger dies, it drops an item on the ground.  Certain colors used against each Avenger will do 97% Damage to them:

 
Green Avenger Essences -> use against BLUE dream avengers
White Avenger Essences -> use against: GREEN dream avengers
Blue Avenger Essences -> use against: RED dream avengers
Red Avenger Essences -> use against: WHITE dream avengers
 
* GTT ref /con clicks to colors include below in related trigger section.
 
  • Colored intermediate orbs also spawn during this stage.  Avoid them or be stunned (Essence of Health)
STAGE 3

Dream Champions:
  • Green Visage - Endurance Drain + 4k DoT + Treant illusion (single-target, curse counter 5)

  • Blue Visage - Mana Drain + Turepta illusion (single-target, curse counter 5)

  • White Visage - AC reduction + Giant Floating Skull illusion (single-target, curse counter 5)

  • Red Visage - Cap HP 85% + Red Nekhon illusion (single-target, curse counter 5)
     
  • Puppets during this stage drop click items we can use to reduce resistance on select colored Dream Champions as follows:

 
Greater Blue Essences -> use against RED dream champions (reduces cold resist)
Greater White Essences -> use against GREEN dream champions (reduces curruption resist)
Greater Green Essences -> use against BLUE dream champions (reduces poison resist)
Greater Red Essences -> use against WHITE dream champions (reduces fire resist)

* GTT ref /con clicks to colors included below in related trigger section.
 
  • Colored orbs also spawn during this stage, and work just like prior stages.  Avoid them:


Advanced Orbs:
Blue Eruption - PBAE 5k DoT + Stun (6s)
Green Eruption - 3k DoT + Root
Red Eruption - 9k DoT PBAE (30' range)
White Eruption - SILENCE + Snare

Stun Orb: Casts stun (of course! Stun Essence 30s duration)
[/list]

The Dream Master's Avatar

Final boss stage.

  • Hits for 24000; AE Rampages (full damage)
  • Burn boss.  Tanks disc and OT any adds that spawn.
  • Color of Dream Master indicates spell weakness as follows:
    • Normal color = USE FIRE
      Green = Use Corruption
      Blue = Use Poison
      Red = Use ICE


The Puzzles
 
Stages 1, 2, 3 above all have a related puzzle that must be solved to advance to the next stage.

  • Each puzzle area has four colored pads: Red, Blue, White, and Green
  • A pad is turned on or off by stepping on it.

PUZZLE 1

In-game Lore/Text:
The Dream Master shouts 'I will only give you so long to complete my challenges. The flames in front of me represent the time you have left. If you kill my avatars, I will extend your time. Now, I am thinking of four colors. Can you guess which ones?'

The Dream Master shouts 'Go! Find the colored buttons and see if you discover the colors in my mind! If you must, you may ask me for a [hint]'

You say, 'Give us a hint'

The Dream Master says 'Come, now this is the easy one! I want you to guess one color for each room. Make your choices by stepping on a colored button. When each room has made their choice, I will tell you how many you got right.'


PROBLEM: Dream Master thinking of FOUR colors; we have to guess which color for each room.

SOLUTION:

When all four puzzle solvers step on a pad; The Dream Master will emote how many we have correct.  From there, each puzzle solver will have to figure out which color is theirs; one at a time.

Center solver figure out theirs first, then South, then West, then North.

    Each puzzle solver steps onto their red pad.
     
    The Dream Master emotes how many you have correct.

    If it's 0, you know that no one's color is red, so everyone moves to their blue pad.

    If you only have 1, 2, or 3 correct, everyone steps off their red pad.

    The center solver steps onto the blue pad; the other three step back onto their red pad.

    You'll get another emote about how many you have correct.
     
      If the number correct
decreases, everyone steps back off their pads.
 
    The center solver moves back to the red pad (since the correct number decreased, you know the previous pad you were on to be the correct one).
 
If the number correct stays the same, everyone steps back off their pads.
 
    The center solver steps onto the white pad (since the correct number stayed the same, you know neither the red pad nor the blue pad was the correct one); the other three step back onto their red pad.
 
If the number correct increases, you know the center pad is now correct and the next solver can use the same method to figure out their color. [/list][/list]


Example1:

    Everyone starts off on red.
      Emote says you have 1 correct; everyone steps off their pads.
    The center solver moves to blue; the other three step back on red.
      Emote says you have 1 correct; everyone steps off their pads.
    The center solver moves to white; the other three step back on red.
      Emote says you have 2 correct; everyone steps off their pads.
        The center solver now knows their correct pad is the white one.
    The south solver moves to blue; center solver steps back on white; the remaining two step back on red.
      Emote says you have 1 correct; everyone steps off their pads.
        The south solver now knows their correct pad is the red one.
    The west solver moves to blue; center solver steps back on white; south solver back on red; north solver back on red.
      Emote says you have 2 correct; everyone steps off their pads.
    The west solver moves to white; center back on white; south back on red; north back on red.
      Emote says you have 3 correct; everyone steps off their pads.
        The west solver now knows heir correct pad is the white one.
    The north solver moves to blue; center back on white; south back on red; west back on white.
      You get an emote finishing the puzzle (center was white; south was red; west was white; north was blue).


PUZZLE 2

In-game Lore/Text:
The Dream Master shouts 'You may have read my mind, but I will control your bodies! Dance for me! Do whatever I say!'

The Dream Master shouts 'I will show you my instructions in each of the rooms. Do you think you can remember them?'

The Dream Master shouts 'Watch the orbs and heed my commands! If you must, you may ask for a [hint]'

You say, 'Give us a hint'

The Dream Master says 'In each room I will display a different series of colors. Adventurers in each room must then step on the buttons in same order as the colors I have shown to you. If the order is wrong in even one room, everyone fails, and I will show the color sequences again.'


PROBLEM:

At the beginning of Stage 2, each puzzle solver must be ready to watch and record the orb's sequence of 15 color changes.

The color changes will be a random order of red, blue, white, and green.

In the middle of each puzzle area is a floating orb.  When lit up, the orb appears like a wisp (like the worry wraiths, or daydreams model).

It will light up for about 2 seconds and then go dark for 2 seconds. Then it will light up for another 2 seconds and then go dark for 2 seconds, repeating itself until it's shown you its entire sequence of 15 colors.

Once the orb is done its display and you've recorded its color changes in sequence, the four puzzle solvers need to step on their pads in that same order. This completes the puzzle.


Be aware:

  • A colored pad needs to be in upright position before one can step on it

 
If a puzzle solver steps on a pad when it's in a downward position; it won't count

This matters when the same color sequence is in play for example: white, white, white.  We have to wait for the white pad to reset each time before stepping back on it.
 
  • If any puzzle solver fails to step on their pads in the proper order, the puzzle resets.

 
If this happens, puzzle solvers must be ready to quickly record the new color order.
[/list]

Failure emote:
    The Dream Master says 'Fail! Adventurers in the main arena stepped on the incorrect sequence!'
    The Dream Master shouts 'If one group fails, everyone does! Try again!'
    The Dream Master shouts 'Watch the orbs and heed my commands!'
    [/list]

    Success emotes, one per related area:
      The Dream Master says 'Good! Adventurers in the main arena remembered the sequence!'
      The Dream Master says 'Good! Adventurers in the south room remembered the sequence!'
      The Dream Master says 'Good! Adventurers in the west room remembered the sequence!'
      The Dream Master says 'Good! Adventurers in the north room remembered the sequence!'
      The Dream Master shouts 'You have not finished my challenge! Defeat your enemies!'
      [/list]


      SOLUTION:

      Puzzle solvers, watch the order of colors.  Write/Type or enter each into a hotkey temporarily.

      Use whatever method works for you.  Short form might be one possible way:

      Using first letter abbreviations (G)reen, (B)lue, (W)hite, (R)ed.  So watching the sequence, you could write it down and group by 5 for easier reading:

      GBBWR BGGRW RRBWW

      Once everyone confirms they have all of the sequence written down in some way, you can all begin doing them.  Everyone can do it at the same time.


      PUZZLE 3

      In-game Lore/Text:
      The Dream Master shouts 'One action causes another. One goes down, and others come up. Can you turn on all of them?'

      The Dream Master shouts 'Adventurers in the adjacent rooms, listen to the instructions of your leader in the main arena.'

      The Dream Master shouts 'Now, prove to me your intellect! If you must, you may ask for a [hint]'

      You say, 'Give us a hint'

      The Dream Master says 'The grid of orbs corresponds to each of the four button rows. The top row of orbs corresponds to the row of buttons in the main arena. The second row of orbs corresponds to the button row in the south room. The third row of orbs corresponds to the button row in the west room. The last row corresponds to the north room. Each column of orbs, from left to right, corresponds to the button colors: green, white, blue, and red. Whenever you step on a button, you toggle that button's state, as well as the states of the buttons above, below, to the left, and to the right. When a button goes down, the orb on the grid corresponding that button will light up. Your goal is to turn on all the lights.'


      PROBLEM:

      SOLUTION:

      Shortly after the start of Stage 3, the Center puzzle solver will see 16 orbs (4 by 4 rows and columns).  Some will be ON, some OFF. 

      This is puzzle based on "Lights Out", except we want to turn the lights on.  But the concept is the same: Step on a pad, and all the adjacent ones that are OFF, turn ON, and lights that were ON, turn OFF.

      Easiest way is using the Allahkazam screenshots and muddle through the rest with steps and an example.  There's a Javascript link also, I'll reference further down.


      Example1: This is how the puzzle MIGHT LOOK to start out
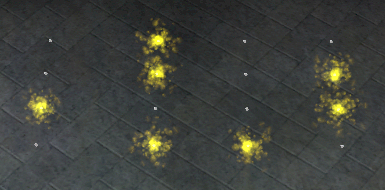


      With the above labeled, and facing EAST, it is as follows:
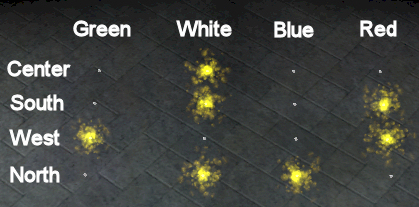


      Using the above example, the following pads are OFF:

      Center: Green, Blue, Red
      South: Green Blue
      West: White, Blue
      North: Green Red


      The center puzzle solver needs to co-ordinate with the three other solvers to light up the entire grid of orbs.

      This is how we need the final puzzle to look:
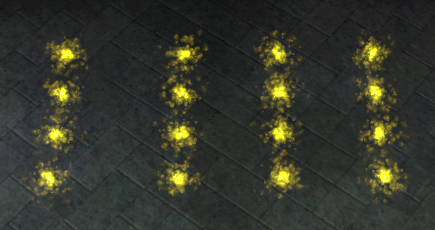

      Source: Allahazams


      Solving it:

      There's a couple ways to go about solving this puzzle.  But we want to do it in the LEAST amount of time/moves.

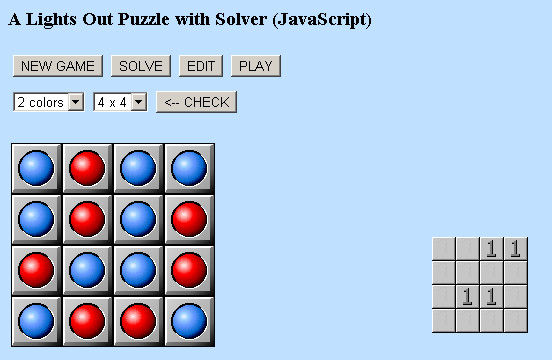
      Easiest way, is to use this LIGHTS OUT PUZZLE SOLVER javascript page.

      Steps:
      [olist]
      • Load page, select 4x4 grid from pull down.
      • Click EDIT twice to make them all blue.  This mode allows you to turn colors on/off without any others changing.
      • Match the in-game view.  Click squares RED that show ON (as wisps) in-game.
      • Once you have it matching, click the SOLVE button.
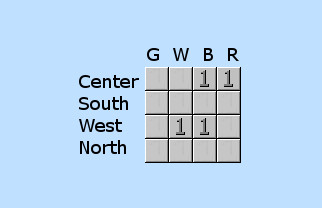
      • A binary grid pop up will appear for your solution.  Blank squares = 0's.  1's = Pads that need to be stepped on
      • [/olist]


        Using our above example:


      Breakdown solution:


      Looks like we can do this one in only FOUR moves:

      Center = Blue, Red
      South = None
      West = White, Blue
      North = None
       

      Applying solution:

      Order matters!  Each person must complete their step (if any) before the next proceeds.

      Order is: Center, South, West, North.

      Let's work through the example to play it out:

      [olist]
      • Center steps on BLUE, then RED.  Then tells WEST to go (south is skipped because there's nothing to do)
      • West steps on WHITE, then BLUE.  That should complete the puzzle.  North is skipped because there's nothing to do.
      • [/olist]
        Note: You can step on pads when they are pressed down and it works.  This is the only puzzle that works like this.  So try not to run over other pads en route to the one you're after.


      Text / Audio Triggers
      [/size]

      NONE


      2373
      Upcoming Events & Strategy / Re: HoT - SS4 - Islands of Sand
      « on: August 12, 2012, 05:07:13 PM »
       
      Adjusted Strat area of post to describe how/where Tornadoes spawn.


      2374
      Upcoming Events & Strategy / Re: HoT - SS4 - Islands of Sand
      « on: August 12, 2012, 04:13:21 AM »
       
      Defeated Saturday, August 11, 2012.

      This event is just funny to watch people get DT'd.  I got hit once, but DA saved me!

      For future reference.  The Tornadoes spawn from middle, and fan out towards where the Dervish died.  So with this knowledge, run accordingly based on your position as not to be caught.


      2375
      Upcoming Events & Strategy / HoT - SS4 - Islands of Sand
      « on: August 10, 2012, 09:47:19 PM »
       
      Sanctum Somnium - #4 - Islands of Sand
      [/size]


      Zone & Instance Info
       
      Gather Zone: Sanctum Somnium

      NPC Name: Towerguard Raena
      NPC Location: She's located on the balcony across from the zone-in.

      Keyword to Enter: fight


      Flag & Key Requirements
       
                                              
      Zone Flag: Group zone access to Morell's Castle
      Event Key: Sanctum Key
      Event Flags: Completion of the FIVE Tier 3 raids:
      Guardian of the House
      At World's End
      Force of Eternity
        Cazic's Final Stand
        The Awakening
       
      * Minimum Piggy/85'/push into raid: None


      Brief Event Overview and Strat

      For this event, as we kill each Dervish, FOUR tornadoes spawn in the middle and rush towards where the dervish died.

      We must AVOID THE TORNADOES or be DEATH TOUCHED.

      The Tornadoes spawn from middle, and fan out towards where the Dervish died.  Run away accordingly; based on your position to avoid being DT'd.

      Once all five dervishes are killed, Lord Silifore spawns.  Assist MA when called on.

      Splash heavy during Lord Silifore please; lots of AE's in play.

      Any questions, please ask in the FLRaids:raids channel.  Thanks.


      Dervishes & Tornadoes

      As we kill each Dervish, FOUR tornadoes spawn in the middle and rush towards where the dervish died.

      We must AVOID THE TORNADOES or be DEATH TOUCHED.

      Dervish Details:
      • Hit for 24000

       
      • Blinding Breeze - 25k DoT + Decrease Mana Pool + Blind (single-target, RNG targets)
      Lord Silifore

      After the 5th Dervish dies, Silifore spawns near the port-up location.

      • Hits for 24000


      Text / Audio Triggers - Mandatory
      [/size]


      ALL Mandatory Setup

      Warning when Tornadoes spawn to look out and avoid them or be Death Touched.

      GTT All-in-One Puppy: hot_ss4.gtt

      Audio File:

      Alert5.wav


      2376
      Upcoming Events & Strategy / Re: HoT - SS3 - Under the Sea
      « on: August 12, 2012, 05:00:57 PM »
       
      Adjusted /rs Strat prep section regarding what to do when the final boss dies, as well as loot process thereafter.


      2377
      Upcoming Events & Strategy / Re: HoT - SS3 - Under the Sea
      « on: August 12, 2012, 04:09:02 AM »
       
      Defeated Saturday, August 11, 2012.

      Everyone enjoyed fighting in the water was the feeling I got!  /em runs.

      Overall, we'll do the final part different: Once the Deepsea Leviathan dies, run up to Mersela above and say "Leave", to be ported out of the instance to remove the effect and avoid drowning.  Then run back to base camp in water again, or advance to next event area if you're not interested in loot.

      What wasted our time was the TL to bind someone did by mistake and lots of people took it unknowingly and had to run back.  Learning experience all, and no ones fault.  We'll make the necessary adjusts and improve our time on this event.

      Loot worked fine with Shark kiting briefly as winners looted their items.  We only tested killing them tonight to see how many HP they had and their actual repop time as we waited on people to run back.  It appears to be 2 minutes for future reference.


      2378
      Upcoming Events & Strategy / HoT - SS3 - Under the Sea
      « on: August 10, 2012, 09:46:02 PM »
       
      Sanctum Somnium - #3 - Under the Sea
      [/size]


      Zone & Instance Info
       
      Gather Zone: Sanctum Somnium

      NPC Name: Towerguard Raena
      NPC Location: She's located on the balcony across from the zone-in.

      Keyword to Enter: fight


      Flag & Key Requirements
       
                                              
      Zone Flag: Group zone access to Morell's Castle
      Event Key: Sanctum Key
      Event Flags: Completion of the FIVE Tier 3 raids:
      Guardian of the House
      At World's End
      Force of Eternity
        Cazic's Final Stand
        The Awakening

      * Minimum Piggy/85'/push into raid: None


      Brief Event Overview and Strat

      Assist MA as we pull and kill each miniboss and various adds. 

      Once the 5th miniboss is dead, The Deepsea Leviathan spawns.  Assist MA as we burn it down.

      Straight forward event, with a couple AEs from Leviathan.

      Once The Deepsea Leviathan dies; run up to Mersela and say "Leave", to be ported OUT of the instance in order to remove the Drown effect.  Then run back to base camp in the water again, or advance to the next event area if you're not opting in on loot.

      For loot, we'll do out of range of Sharks.  When done, we'll kite sharks briefly to allow winners to loot their items.

      Any questions, please ask in the FLRaids:raids channel.  Thanks.


      Sharks, Bait and Hand-ins

      We collect bait from boxes around the event area.  Each bait hand-in activates the related mermaid miniboss.

      • Hit for 24000

       
      • Straight up melee, no specials/aes.

      Hand-in to Shark Name:
        A Pile of Shrimp is given to a kraken.
        A Sack of Bloody Fish Heads is given to a hammerhead shark.
        A Slab of Seal Meat is given to a great white shark.
        Herring is given to a deadly anglerfish.
        Tuna is given to a hungry regrua.
      GTT - Mob /con to related bait item: hot_ss3.gtt

      Note: The triggers I made above are merely to aid whoever we task with bait hand-in duty.


      The Deepsea Leviathan

      When all five mermaids are dead, Leviathan spawns.

      • Hits for 24000

       
      • Tail Slap - 33k DD + Casting Interrupt + Stun
         
      • Devastating Wound - 25k DoT -240 AC (single-target, 5 min duration, detri)
         
      • Drown - Negates Enduring Breath Effect

      2379
      Upcoming Events & Strategy / Re: HoT - SS2 - The Essence of Dreams
      « on: August 12, 2012, 04:51:20 PM »
       
      Changed /rs prep to stress RANGE DPS importance in avoiding the MEZ AE's.


      2380
      Upcoming Events & Strategy / Re: HoT - SS2 - The Essence of Dreams
      « on: August 12, 2012, 04:03:11 AM »
       
      Defeated Saturday, August 11, 2012.

      Different visual space to fight in for sure.  Remember all to range dps!


      2381
      Upcoming Events & Strategy / HoT - SS2 - The Essence of Dreams
      « on: August 10, 2012, 09:42:26 PM »
       
      Sanctum Somnium - #2 - The Essence of Dreams
      [/size]


      Zone & Instance Info
       
      Gather Zone: Sanctum Somnium

      NPC Name: Towerguard Raena
      NPC Location: She's located on the balcony across from the zone-in.

      Keyword to Enter: fight


      Flag & Key Requirements
       
                                              
      Zone Flag: Group zone access to Morell's Castle
      Event Key: Sanctum Key
      Event Flags: Completion of the FIVE Tier 3 raids:
      Guardian of the House
      At World's End
      Force of Eternity
        Cazic's Final Stand
        The Awakening
       
      * Minimum Piggy/85'/push into raid: None


      Brief Event Overview and Strat

      Shadow of the Heart spawns a miniboss at 100%, 50%, and 25% intervals.

      She also casts a long MEZ + Stunspin.  Paladin Splash, RC AA, or Pure Spirit can remove.

      Each Miniboss AE's a long MEZ

      Every 35 seconds Shadow adds spawn and must be killed.  These proc the MEZ as well.

      Assist MA when called on, and RANGE DPS to avoid the mez!

      Any questions, please ask in the FLRaids:raids channel.  Thanks.


      Shadow of the Heart

      • Hits for 22000

       
      • Shadow of Dreams 3x spawn on engage, and every 35 seconds.  They hit for 8500, and proc MEZ spell (Quiet Slumber)
         
      • At 100% HP, Dream Harvester spawns.

       
      • At 50% HP, Dream Reaver miniboss spawns.

       
      • At 25% HP, Dream Destroyer miniboss spawns.

      Shadow of the Heart AEs:
      Minibosses

      All of these hit for 13000, and proc MEZ (Quiet Slumber).

      In addition to the proc mez, each has its own flavour of AE also.


      DREAM HARVESTER: Harvest Dreams - 500 Mana Drain DoT (single-target).

      DREAM REAVER: Reave Dreams - 25k DoT + MELEE SLOW + Snare

      DREAM DESTROYER: Destroy Dreams - 35k DD PBAE (25' range)


      Text / Audio Triggers - Mandatory
      [/size]


      ALL Mandatory Setup

      For when adds spawn, it's good to have a heads up.

      GTT All-in-One Puppy: hot_ss2.gtt

      Audio File:

      Alert5.wav


      2382
      Upcoming Events & Strategy / Re: HoT - SS1 - Taking the Tower
      « on: August 12, 2012, 04:49:29 PM »
      Quote
      Quote
      Just some extra info on the adds.  Rotdogs = stunnable, stealthy assassins = stunnable, Plagued Mosquitos = stunnable,  Mutated Gnats = stunnable.

      I went back and checked my combat logs just to be sure, got no stun immune messages on any of the above mobs.

      Thanks Pandrax, I'll update OP before next run.  Just tired/late atm.
       
      Updated strat post.


      2383
      Upcoming Events & Strategy / Re: HoT - SS1 - Taking the Tower
      « on: August 12, 2012, 03:56:11 AM »
      Quote
      Just some extra info on the adds.  Rotdogs = stunnable, stealthy assassins = stunnable, Plagued Mosquitos = stunnable,  Mutated Gnats = stunnable.

      I went back and checked my combat logs just to be sure, got no stun immune messages on any of the above mobs.

      Thanks Pandrax, I'll update OP before next run.  Just tired/late atm.

      2384
      Upcoming Events & Strategy / HoT - SS1 - Taking the Tower
      « on: August 10, 2012, 09:41:07 PM »
       
      Sanctum Somnium - #1 - Taking the Tower
      [/size]


      Zone & Instance Info
       
      Gather Zone: Sanctum Somnium

      NPC Name: Towerguard Raena
      NPC Location: She's located on the balcony across from the zone-in.

      Keyword to Enter: fight


      Flag & Key Requirements
       
                                              
      Zone Flag: Group zone access to Morell's Castle
      Event Key: Sanctum Key
      Event Flags: Completion of the FIVE Tier 3 raids:
      Guardian of the House
      At World's End
      Force of Eternity
        Cazic's Final Stand
        The Awakening
       
      * Minimum Piggy/85'/push into raid: None


      Brief Event Overview and Strat

      Know your group number please, as you'll be split up and assigned to different areas.  Thanks.

      We'll split up, and crawl through each area of the maze killing various rotdogs encountered.  Stun/Mez and assist MA for these.

      Eventually, we'll all meet up and take on The Executioner. 

      The Executioner targets players with a DT.  You must get curse cured within 10 seconds or die.

      When Executioner is dead, we'll med up and take on the next stage of the event.

      Stage 2:  Three  Minibosses, with friends and Emotes

      Assist MA for this stage, as we take on each Miniboss, but killing the adds first.

      Watch your emotes please!  Aside from the DT, there's a nasty Viral AE that must not be spread, get cured when your trigger fires.


      Stage 1 - Maze Rotdogs & The Executioner

      Groups will be split up, and work their way through different areas of the maze, encountering rotdogs along the way which need to be killed.

      ROTDOGS:
      • Hit for 17000

       
      • Mezzable

       
      • Stunnable
       
      THE EXECUTIONER:
      • Hits for 22000

       
      • AE: Judgement - 31k DD + Snare (200' range)
         
      • AE: Punishment - SILENCE + Reduce mana pool by 7200
         
      • DT EMOTE: Players targeted for DT; must be Curse cured within 10 seconds or death occurs.


      Stage 2 - The Watcher, Master Hemlock, Lawman Rurk

      We kill each Miniboss to spawn the next.

      Be aware, a couple minibosses have an emote/mechanic we have to deal with.


      THE WATCHER:

      • Hits for 22000

       
      • AE: Lurid Gaze  - SILENCE + 42k DD
         
      • AE: Inner Fear - Self Buff, Spell Reflect chance + Haste increase for boss.
         
      • Spawns stealthy assassin adds at 75% and 25% Health.  Adds hit for 17000.  Stunnable!  But immune to mez.

      MASTER HEMLOCK:

      This one spawns along with two guards.  Longer the guards remain alive, the stronger Hemlock gets.  Guards hit for 20k.

      • Hemlock Hits for 22500

       
      • Random players targeted with: Reduction Melee SLOW + 39k DD + Mana Pool Reduction 5300 + Shrink
         
      • AE: Surge of Light - Mana / Endurance DRAIN + DD 29k + Banishment (pushes you around the room).
      LAWMAN RURK:
      • Hits for 24000

       
      • Targets players with Dismissal (DD + chance to proc FEAR)
         
      • Lawman's Blight (26k DoT)  targets random players.  6 seconds to cure, or everyone nearby gets: Plagued Mutation (Mana drain + Melee/Spell slow).
         
      • Spawns adds at 65% and 25% health.  Plagued Mosquitos = Mezzable and Stunnable.  Mutated Gnats = Unmezzable, but stunnable.

       
      Adds spawning emote: Gnats and mosquitoes begin to swarm around you.

      [/list]

      Text / Audio Triggers - Mandatory
      [/size]

      ALL Mandatory Setup

      GTT All-in-One Puppy: hot_ss1.gtt

      Audio Files:

      Alert5.wav
      get-cured.wav
      disease-cure.wav

      2385
       
      Adjust:

      Tanks - During the 1st stage minibosses.  Try and corner and/or wall pin them somewhere so we can optimize our DPS further.


      08/06/2012 Edit: Tried this, didn't realised they were leashed.

      Pages: 1 ... 157 158 [159] 160 161 ... 168